
To make a solar cooker from a shoebox, first gather aluminum foil, plastic wrap, and black construction paper. Cut and arrange these materials inside the shoebox to reflect and absorb sunlight, cooking food inside.
DIY solar cookers are gaining popularity as an eco-friendly way to harness the sun’s energy for cooking. Crafting your own solar cooker can be a simple and rewarding project that teaches basic principles of renewable energy. With just a shoebox and a few household items, anyone can create a useful cooking device that utilizes the abundant power of sunlight.
This solar cooker is a fantastic educational tool for kids and adults alike, offering a hands-on experiment that makes understanding solar energy fun and accessible. Whether in your backyard, at a camping site, or during a science class, making a solar cooker out of a shoebox is an easy step towards sustainable living and energy conservation.
Solar Cooking Basics
Welcome to the enlightening world of solar cooking basics, where the energy of the sun transforms a simple shoebox into a powerful tool for preparing your meals. Why settle for traditional methods when the sun’s abundant and renewable energy offers a greener, more sustainable option? Join us on this journey as we explore the fundamentals of harnessing solar power for cooking your favorite dishes. Preparing a solar cooker from a shoebox is not only a fun DIY project but also a step towards eco-friendly cooking practices.
Understanding Solar Cooking
Solar cooking is a method that uses sunlight as the primary energy source to heat and cook food. It is simple, effective, and environmentally friendly. The basic concept involves concentrating the sun’s rays to a central cooking area, which absorbs and converts light into heat. Building a solar cooker out of a shoebox is a fantastic starting point for anyone interested in this sustainable cooking method.
The Science Behind Solar Cooking
The principles of solar cooking are rooted in the laws of physics and thermodynamics. The process begins when sunlight hits the reflective surfaces of the cooker, which typically includes aluminum foil or a mirror. The rays are then directed towards a dark-colored cooking pot, which is designed to absorb the maximum amount of heat. The shoebox acts as an insulator, trapping the heat and creating a mini greenhouse effect, which cooks the food. A clear cover allows sunlight to enter while retaining the accumulated heat.
Benefits Of Using A Solar Cooker
- Environmentally Friendly: Solar cookers utilize a renewable energy source, greatly reducing the reliance on fossil fuels and decreasing carbon footprints.
- Cost-Effective: Post initial setup, solar cookers require no additional expenses for fuel or electricity.
- Convenient: Once set up, these cookers need little supervision, freeing up your time for other activities.
- Health Benefits: They cook at lower temperatures, retaining more of the food’s nutrients while eliminating the need for oils, making meals healthier.
- Versatility: Solar cookers can bake, boil, or steam, offering a range of cooking options.

Credit: www.pinterest.com
Materials Needed
Welcome to the eco-friendly world of solar cooking! Creating a solar cooker out of a shoebox is a fun and sustainable project that harnesses the sun’s energy for cooking. Before we dive into the construction steps, let’s gather all the materials you’ll need to ensure a successful build. Assembling these items beforehand will make the process smoother and more enjoyable. So, let’s get started!
Selecting A Suitable Shoebox
The shoebox serves as the base of your solar cooker, acting as the container where solar energy will be focused. Choose a sturdy shoebox that is in good condition—no tears or significant dents. A medium to large size works best for more cooking surface area.
Criteria For Choosing The Right Shoebox
- Size: The box should be large enough to hold a small pot or baking dish.
- Strength: A firm, intact structure will better support the reflective materials.
- Material: Opt for a cardboard box which will provide great insulation.
- Lid: Ensure the lid fits snugly to trap the solar heat effectively.
Essential Materials For Constructing The Solar Cooker
The following list details all the necessary materials to construct your solar cooker:
| Material | Description | Quantity |
|---|---|---|
| Shoebox | A medium to large sturdy cardboard box. | 1 |
| Plastic wrap | Transparent plastic for trapping heat. | 1 Roll |
| Aluminum foil | Reflective material to direct sunlight. | 1 Roll |
| Black construction paper | For absorbing heat within the cooker. | 1-2 sheets |
Reflective Materials
Reflective materials are key for directing sunlight into the box. Aluminum foil is the ideal choice for its high reflectivity and ease of use. Ensure you have enough foil to cover the interior surfaces of the shoebox.
Adhesives
Secure your materials in place using adhesives. Natural glue that withstands heat well or eco-friendly tape can serve as your adhesive solutions.
Tools
Lastly, gather your tools for the assembly process. This includes:
- Scissors: For cutting the foil and plastic wrap to size.
- Utility knife: To cut any openings if necessary.
- Straight edge or ruler: To ensure your cut lines are clean and straight.
- Marker or pen: For marking cut lines on materials.
Step-by-step Instructions
Turning a humble shoebox into a fully functioning solar cooker is a fun and eco-friendly project. Not only does it tap into renewable solar energy, but it also puts to good use items that would otherwise be discarded. Follow these step-by-step instructions to create your very own portable oven that uses nothing but the power of the sun. Let’s start making green energy work for us—one solar cooker at a time!
Preparing The Shoebox
The first step is to gather all necessary materials for your DIY solar cooker. You will need:
- A shoebox – the size depends on what you want to cook
- Aluminum foil – for its reflective properties
- Plastic wrap – this will be your greenhouse cover
- Black construction paper – to absorb heat
- Utility knife and scissors – for cutting
- Glue stick and tape – for securing materials
Make sure the shoebox is clean and free from any debris or stickers. This will ensure a smooth surface for applying materials later on.
Cutting And Shaping The Box
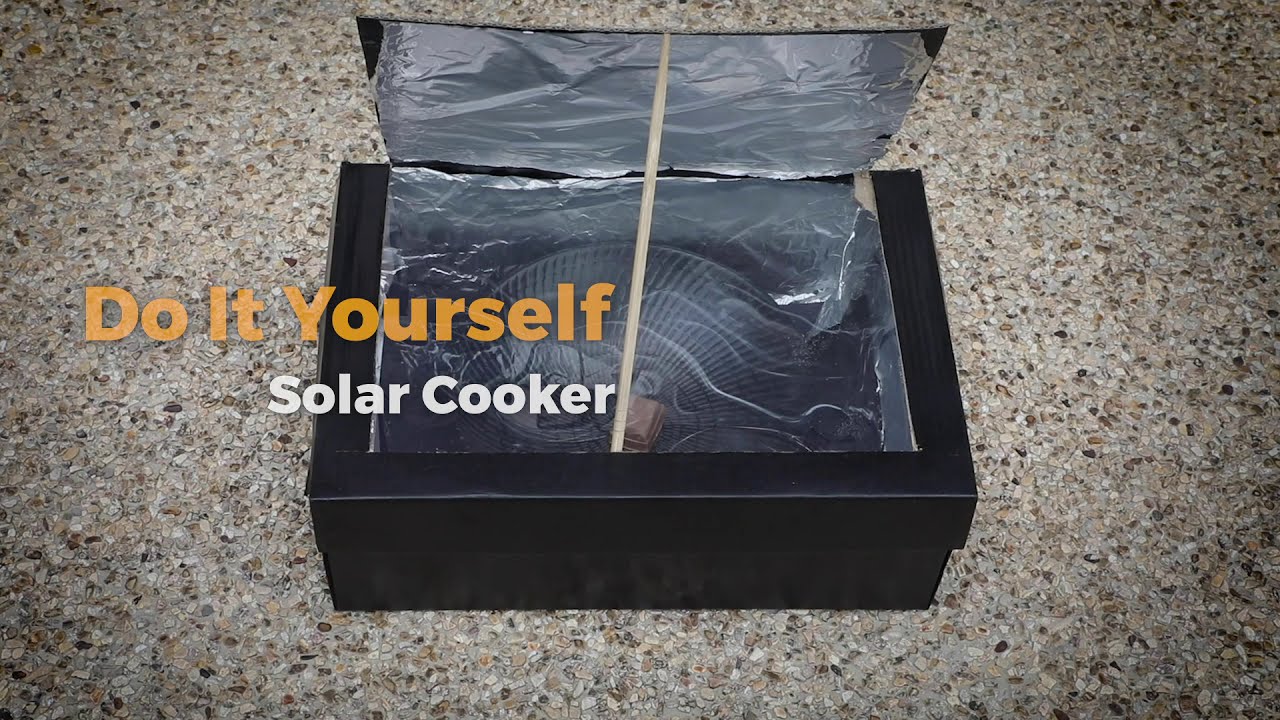
With the utility knife, carefully cut a rectangular flap in the lid of the shoebox. It should leave at least a one-inch border around the edges. The flap will be propped open to reflect sunlight into the box, so precision matters. Fold the flap back along the uncut edge to create a crease.
Applying Reflective Material
Cut aluminum foil to size, then glue it to the inside face of the flap and to the entire interior of the shoebox. Ensure the shiny side faces outwards to maximize reflection. Smooth out any wrinkles or bubbles for the best performance.
Building The Solar Cooker
Line the bottom of the shoebox with black construction paper; this will absorb the sun’s heat. Then, create an insulating layer by closing the lid and taping the seams shut. For a secure cooking area, line the inner sides of the lid around the flap with strips of aluminum foil, reflecting more sunlight into the box.
Assembling The Reflective Panels
To enhance the effectiveness of your solar cooker, add additional reflectors. Cut two to four panels out of cardboard, and cover one side of each with aluminum foil. Position these panels around the outside of the box, angling them to reflect more sunlight into the interior.
Securing The Cooking Chamber
Lastly, close the lid of the shoebox, with the foil-lined flap propped open. Over the opening where the glass would be in a standard solar cooker, stretch a layer of plastic wrap tightly to create a seal. This will trap the heat inside while still allowing sunlight to enter. The wrap should be secured with tape all around the edges to prevent heat from escaping.
With these simple steps, your shoebox solar cooker is now ready to transform sunshine into a cooking heat source. Pick a sunny spot, angle your cooker towards the sun, and watch as it harnesses solar energy to bake, melt, or warm foods. It’s not just a project; it’s a practical tool powered by nature herself!
Testing And Using
Embarking on a DIY journey with a solar cooker made from a shoebox is not only an environmentally conscious project but also an engaging one. Once you’ve assembled your cooker, the real excitement begins with testing and using your new sustainable gadget. Let’s explore how to ensure your solar cooker is effective, conduct a safe cooking test, and optimize its use for the tastiest results under the sun!
Testing The Effectiveness Of The Solar Cooker
Before you can cook your first solar-powered meal, it’s crucial to test your cooker’s performance. Begin by placing a thermometer inside to monitor the temperature increase. Choose a sunny day and set the cooker outside in direct sunlight. Give it time to absorb and convert sunlight to heat. The temperature inside should rise significantly if your cooker is working correctly. For a quantifiable measure of success, look for an internal temperature of at least 200 degrees Fahrenheit, which indicates your cooker is ready for real cooking!
Conducting A Simple Cooking Test
With your cooker verified, it’s time to test its culinary capabilities! Start with something simple, like roasting vegetables or heating soup. Place your food in a dark-colored pot for maximum heat absorption. Set the pot inside the cooker, close the lid if applicable, and let the sun do its work. Record the time it takes to cook and note any changes needed for future use. This initial test informs future cooking times and adjustments for different recipes.
Safety Precautions And Best Practices
- Never leave your solar cooker unattended, especially on windy days.
- Use oven mitts or pot holders to handle cookware, as it can get surprisingly hot.
- Ensure the cooker is placed on a stable, non-flammable surface.
- Keep water nearby in case of an unexpected fire.
- Do not look directly into the reflective surfaces.
Positioning The Solar Cooker
To reach optimal cooking temperatures, positioning of your solar cooker is key. Adjust the cooker so that it faces directly towards the sun. You’ll want to angle the reflective lid to bounce sunlight directly into the box. Throughout the cooking period, realign your cooker to follow the sun’s path, maximizing exposure and ensuring even cooking.
Monitoring The Cooking Process
Keep tabs on your dish as it cooks. Check periodically to observe the temperature and make adjustments if necessary. Depending on the food and weather conditions, cooking times will vary. An average solar cooker may take twice as long as conventional methods, so patience is essential. Stick around to savor the scent of your success and to prevent any incidents due to overheating or tipping over.
Frequently Asked Questions On How To Make A Solar Cooker Out Of A Shoebox
How To Make A Simple Solar Cooker?
Gather a cardboard box, aluminum foil, and clear plastic wrap. Line the box interior with foil. Attach the wrapped plastic to the top for heat retention. Place the cooking pot inside, and direct towards sunlight.
How To Make A Box Type Solar Cooker?
Choose a sturdy cardboard box. Line the interior with aluminum foil to reflect sunlight. Use a black pot for cooking, as it absorbs heat well. Seal the box with a glass lid for insulation. Aim the box towards the sun for maximum exposure.
How Do You Make A Parabolic Solar Cooker Out Of Cardboard?
To create a parabolic solar cooker from cardboard, cut a parabolic shape, cover it with reflective material, and attach a cooking pot holder at the focus point for optimal sun ray concentration.
How Do You Make A Solar Oven Out Of A Cereal Box?
To make a solar oven from a cereal box, cut a flap in the top, leaving one side intact. Cover the flap’s inner side with aluminum foil for reflection. Line the box interior with black construction paper to absorb heat.
Seal it with plastic wrap across the opening and place in the sun.
Conclusion
Crafting a solar cooker from a simple shoebox is both eco-friendly and satisfying. It’s a perfect project to harness the sun’s power for cooking. With materials at hand and our easy-to-follow steps, you’re now equipped to make your own. Enjoy your sustainable cooking journey and the delicious rewards it brings.
Share your experiences and inspire others to try this green cooking alternative!