
To make a solar oven from a cardboard box, line the interior with aluminum foil and place a clear plastic or glass cover on top. Secure the reflective panels to concentrate sunlight into the box.
Harnessing the sun’s energy to cook food sustains both the environment and our fascination with innovative DIY projects. A solar oven utilizes the basic principles of concentration, absorption, and insulation to transform solar energy into heat, enabling you to bake or cook without conventional power.
Creating a solar oven from a simple cardboard box is a cost-effective and educational activity that combines science and fun. Suitable for backyard experiments or educational settings, this eco-friendly apparatus demonstrates the potential of renewable energy. These self-made ovens can reach temperatures sufficient for cooking various dishes, making them an intriguing option for sustainable living enthusiasts and curious minds eager to explore green technology.
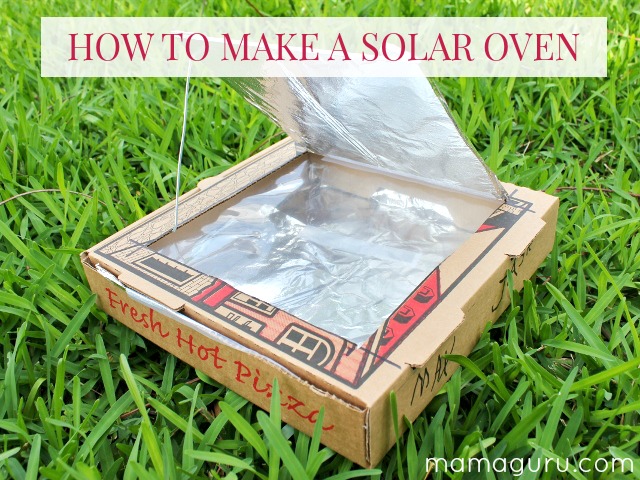
Credit: mamaguru.com
Materials And Setup
Welcome to the creative world of DIY solar cooking! Crafting a solar oven from a simple cardboard box is not only a fun project but also a fantastic way to utilize renewable energy for everyday cooking. Perfect for baking, roasting, and slow cooking – your homemade solar oven will harness the power of the sun with just a few basic materials. Let’s get started on setting up your very own eco-friendly kitchen gadget.
Cardboard Box Selection
Cardboard Box Selection
The foundation of your solar oven is a cardboard box. Select a box that is large enough to accommodate the pot or pan you plan to use. A double-layered box works best for insulation, ensuring that the heat the solar oven captures is retained.
- Sturdy and large: The box should be durable and at least 15 inches in length and width.
- Double-layered: This provides better insulation.
- Clean: Make sure the box is free from contaminants or substances that could be harmful under high heat.
Aluminum Foil Application
Aluminum Foil Application
To reflect the sun’s rays into your oven, the application of aluminum foil is crucial. You’ll want to line the inside of your box with a reflective foil for maximum light and heat capture. A smooth, shiny surface will ensure the best results.
- Cover interior surfaces: Apply foil to the inner sides, bottom, and the underside of the lid or flap.
- Smooth out wrinkles: For enhanced reflection, keep the foil as smooth as possible.
- Secure with glue: Use a non-toxic glue suitable for high temperatures to fix the foil in place.
Clear Plastic Covering
Clear Plastic Covering
A clear plastic covering is necessary to create a greenhouse effect inside your solar oven. This covering should be tightly sealed to trap the sun’s energy while allowing sunlight to penetrate. Opt for an oven roasting bag or a similarly heat-resistant clear plastic.
| MATERIAL | PURPOSE | SPECIFICATIONS |
|---|---|---|
| Oven Roasting Bag | To trap heat | Large enough to cover the opening of the box |
| Clear Tape | For sealing edges | Heat-resistant, non-toxic |
Trim the plastic to fit over the top of the solar oven, slightly larger than the opening to allow for secure sealing. Adhere the plastic to the rim with a tape that can withstand high temperatures, ensuring there are no gaps.
With these materials assembled and your solar oven set up, you’re on your way to solar-powered cooking! Each step brings you closer to an efficient, self-made oven that’s perfect for off-the-grid adventures or environmentally conscious culinary experiments.
Constructing The Solar Panel
Welcome to the core of your DIY solar cooking experience – Constructing the Solar Panel. This essential part of the solar oven is what traps and reflects the sun’s rays, turning a simple cardboard box into a powerful, eco-friendly cooking tool. With sustainable energy on the rise, learning to build your own solar appliances can be both fun and immensely satisfying. Let’s jump right into the key steps to transform a mundane cardboard piece into a sun-harnessing powerhouse.
Cutting The Cardboard Box
Begin with selecting a large, sturdy cardboard box. A pizza box often works well for small-scale ovens. Next, draw a flap on the lid of the box, leaving at least a one-inch border around the three sides. Use a craft knife or scissors to cut along the lines, creating a door that remains attached on one side. Carefully fold this flap so that it stands up when the lid is closed, creating your main reflective surface. This flap will direct sunlight into the box, so ensure it’s cut to optimize reflection.
Applying The Aluminum Foil
Now, it’s time to maximize the reflection. Take high-quality aluminum foil with the shiny side out and cover the flap you just created. Smooth out any wrinkles to ensure a clean, reflective surface. To stick the foil, use either non-toxic glue or double-sided tape, ensuring the entirety of the cardboard is covered. Repeat this process inside the box, lining all inner sides with foil. This will enhance the greenhouse effect inside the solar oven.
Adding The Clear Plastic
The final step in constructing your solar panel involves sealing the heat. Cut a piece of clear plastic wrap or a transparent plastic bag, ensuring it’s larger than the opening of the box. Stretch it over the top of the open lid and secure it with tape around the edges, creating a tight, heat-trapping seal. This plastic layer acts as an insulator, keeping the solar heat within the oven. When sunlight enters through this clear layer, it reflects off the aluminum foil and retains the warmth, effectively cooking the food inside.
Remember to align each step with precision for an effective solar oven that can cook a variety of dishes using nothing but sunlight. With these simple steps, you’ve constructed an efficient solar panel for your homemade oven. Now, let the power of the sun do the cooking!
Solar Oven Insulation
Building a solar oven from a cardboard box is not just a fun DIY project but a lesson in the principles of renewable energy. The key to an effective solar oven, however, lies in its ability to retain heat—a function of proper insulation. Insulation is crucial because it prevents heat from escaping, ensuring your oven reaches and maintains the temperatures necessary for cooking. Let’s dive into the best ways to insulate your solar oven for maximum efficiency.
Use Of Insulation Materials
Choosing the right insulation material can make a world of difference. Here are a few effective insulation materials that can be found around the house or purchased from local stores:
- Aluminum foil: Reflects sunlight and retains heat within the oven.
- Black construction paper: Absorbs heat, contributing to the oven’s temperature.
- Plastic wrap or a glass cover: Seals in the heat while allowing for sunlight penetration.
- Newspaper or wool: Provides additional layers that trap air and reduce heat loss.
- Styrofoam: Acts as a good insulator when lined on the inner sides of the box.
Each material serves a specific purpose in the insulation process. Layering multiple materials can create an even more effective insulating barrier.
Ensuring A Snug Fit
For insulation to be most effective, gaps and spaces must be eliminated. This aspect is critical in preventing heat from leaking out of your solar oven. To ensure a snug fit:
- Measure your box and cut insulation materials to the exact size of the box’s sides, bottom, and lid.
- Seal any cracks or openings with duct tape or a similar adhesive material to prevent air from escaping.
- Consider double-glazing the window by using two layers of plastic or glass, leaving a small air space between them for added insulation.
Careful attention to detail when fitting and sealing insulation materials can be the difference between an oven that barely warms and one that bakes efficiently.
Maximizing Solar Energy
Maximizing Solar Energy is essential when constructing a solar oven from a cardboard box. The oven’s ability to absorb, retain, and utilize the sun’s energy determines its efficiency. By optimizing the angle and position of the oven, and enhancing its reflective surfaces, you elevate the cooking power of your DIY solar appliance. Let’s explore how these factors can be adjusted to harness the sun’s energy to its fullest potential.
Angle And Position Of The Oven
To extract every possible joule of energy from the sun, the angle and position of your solar oven must be spot on. The goal is to focus as much sunlight as possible into the interior of the oven where your food will be cooked.
- Correct Angle: Position the solar oven facing the sun directly. Depending upon your location, the tilt should match your latitude for optimal sunlight absorption.
- Seasonal Adjustments: During various seasons, the sun’s path shifts. Adjust the tilt of the oven to compensate: steeper in winter and flatter in summer.
- Tracking the Sun: To maintain efficiency throughout the day, realign your solar oven periodically to face the sun as it moves across the sky.
Reflective Surfaces Enhancement
Reflective materials within your solar oven bounce sunlight directly onto your cooking vessel, amplifying the heat. Below are tips to enhance the efficiency of these surfaces:
| Surface Material | Benefits | Placement Tips |
|---|---|---|
| Aluminum Foil | Highly reflective and affordable | Smoothly line the inner walls and the flap of the box for maximum reflection. |
| Mirrors | Exceptional reflectivity | Place on the base and the underside of the lid, ensuring they face the cooking area. |
| Glossy Paint | Increases light dispersion | Apply on non-reflective areas to prevent light absorption. |
Critical to this process is the quality of the reflective surfaces. Their cleanliness and ability to reflect without scattering light are pivotal. Ensure they remain spotless and undamaged to maintain the oven’s performance.
Frequently Asked Questions
How To Make A Simple Cardboard Solar Oven?
Gather a cardboard box, aluminum foil, plastic wrap, and tape. Line the box interior with foil, creating a reflective surface. Seal the box top with clear plastic wrap for insulation. Place your food inside and direct it towards the sun to cook.
How Hot Can A Cardboard Box Solar Oven Get?
A cardboard box solar oven can reach temperatures up to 200 degrees Fahrenheit (93 degrees Celsius) on a sunny day.
Can You Make A Solar Oven With A Shoebox?
Yes, you can make a solar oven using a shoebox by lining it with aluminum foil to reflect sunlight and trap heat.
How Do You Make A Solar Oven Out Of A Cereal Box?
To make a solar oven from a cereal box, cut a flap in the long side, leaving an inch around the edges. Wrap this flap and the box interior with aluminum foil. Seal the box with clear plastic wrap and let it sit in direct sunlight.
Cook with the lid closed.
Conclusion
Crafting your solar oven from a simple cardboard box can be a rewarding project. It’s eco-friendly and harnesses the sun’s power for cooking. Dive into this sustainable practice and enjoy the homemade meals it produces. Embrace the sunshine, save energy, and start your solar cooking adventure today.