
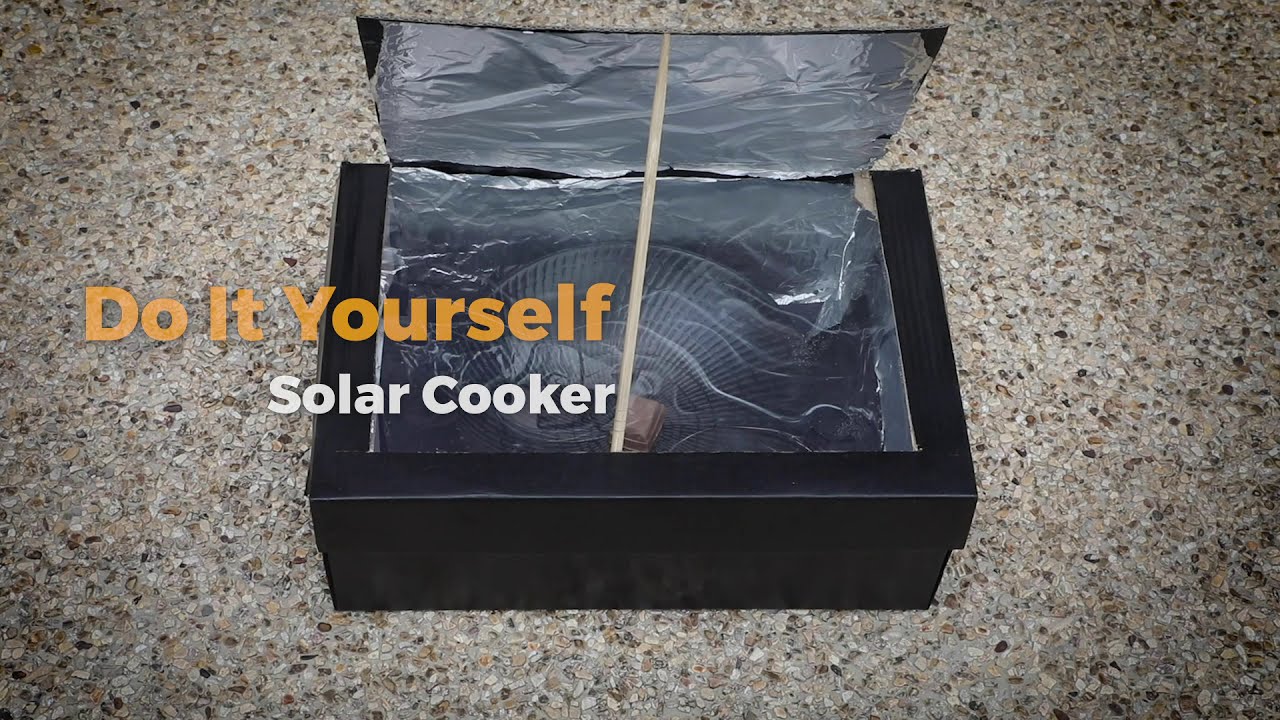
To create a solar oven with a shoebox, line the inside with aluminum foil and cover the lid with a transparent plastic. Secure the reflective panels to focus sunlight into the box where your food will cook.
Embracing the power of the sun for cooking is a fun and educational project that doubles as a resourceful way to understand renewable energy. Crafting a solar oven from a simple shoebox can spark interest in sustainable practices while demonstrating the principles of solar energy.
This DIY project is not only cost-effective but also an excellent activity for students, eco-enthusiasts, and anyone interested in alternative cooking methods. By using materials readily available at home, such as a shoebox, aluminum foil, and plastic wrap, this undertaking promotes recycling and creativity. The step-by-step process engages various skills, including basic construction, scientific observation, and environmental awareness, providing an engaging way to harness the sun’s abundant energy.
Solar Oven Basics
Embarking on a DIY project that combines eco-friendliness with a touch of science can be both educational and satisfying. Enter the solar oven, a device that uses the sun’s energy to cook food. Building a solar oven from a shoebox is a simple, fun project that allows children and adults alike to understand renewable energy and sustainability, all while preparing delicious food using nothing but sunlight. Let’s explore what a solar oven is and delve into the benefits of harnessing solar power for cooking.
What Is A Solar Oven?
A solar oven, also known as a solar cooker, is a device that captures sunlight and converts it into thermal energy to cook food. It typically consists of reflective materials that focus the sun’s rays onto a cook chamber where the heat is retained. This simple yet ingenious contraption can reach temperatures sufficient to cook various kinds of food, sterilize water, and even bake bread.
Solar ovens come in various designs, from complex parabolic models to the straightforward and easy-to-make shoebox solar ovens. The basic components include:
- Reflective surface: To direct sunlight into the oven.
- Absorptive surface: To convert the sunlight into heat.
- Insulation: To trap and retain the heat.
- Enclosure: To hold the cooking pots and capture the heat.
Creating a solar oven out of a shoebox follows these basic principles, using aluminum foil as the reflective surface, a dark-colored pot for absorption, and various insulating materials to keep the heat in.
Advantages Of Using A Solar Oven
Utilizing a solar oven comes with numerous benefits:
- Eco-friendly: Solar ovens use a clean and renewable source of energy, reducing reliance on fossil fuels and minimizing carbon footprint.
- Cost-effective: After the initial setup, solar cooking is free; it eliminates the need for electricity, gas, or other fuels.
- Low maintenance: Solar ovens require very little upkeep, making them practical for long-term use.
- Portable: Many solar ovens, particularly shoebox designs, are lightweight and easy to carry, ideal for camping and outdoor activities.
- Safety: They don’t produce flames, reducing the risk of fire hazards associated with conventional cooking methods.
- Food taste: Slow cooking in a solar oven helps retain the natural flavors of food, often resulting in tastier meals.
With a shoebox solar oven, you’re not just crafting a cooking device; you’re building a tool that promotes sustainability, encourages STEM learning, and can produce healthy, delicious food. Whether for educational purposes, emergency preparedness, or simply to enjoy the art of solar cooking, the advantages of using a solar oven are clear and impactful.
Understanding The Science
Building a solar oven from a shoe box isn’t just a fun DIY project; it’s a practical exploration into harnessing the sun’s energy. This clever device uses simple materials to capture and concentrate solar heat, demonstrating the potential of renewable energy sources. To appreciate the full capabilities of your homemade solar cooker, let’s dive into the scientific principles that make it tick.
How Solar Ovens Work
Solar ovens, or solar cookers, are devices that convert sunlight into thermal energy. The core concept is simple: sunlight, composed of a spectrum of light waves, carries energy. When these waves hit an object, they can be absorbed and converted into heat. A solar oven takes advantage of this by using reflective surfaces to concentrate light—and consequently, heat—onto a specific area, often where a pot or pan might sit.
- Insulation is crucial to keeping the trapped heat from escaping.
- A transparent cover allows sunlight to enter while also preventing heat from leaving, creating a greenhouse effect.
- The inside of the box is painted black because dark colors absorb more heat, thus raising the temperature inside the oven.
Solar Oven Design Principles
The design of a solar oven revolves around maximizing efficiency and heat retention. Let’s consider the key principles:
| Design Element | Purpose | Material Suggestions |
|---|---|---|
| Reflective Surfaces | To concentrate sunlight into the box | Aluminum foil, reflective mylar |
| Absorption Surface | To convert light to heat effectively | Black paint or construction paper |
| Insulation | To retain heat for cooking | Newspapers, wool, or foam |
| Transparent Cover | To allow sunlight in and prevent heat escape | Glass or clear plastic wrap |
By considering these principles, you can craft a solar oven that not only captures the sun’s power but also cooks effectively. Emphasizing efficient light-to-heat conversion and effective thermal insulation, your shoe box solar oven will not only be a scientific marvel but also a useful tool in your sustainable living arsenal.
Materials And Tools Needed
Welcome to the eco-friendly DIY project that harnesses the power of the sun! Building a solar oven with a shoe box is not only a fun activity but also a step towards sustainable living. Before we get started, it’s essential to gather all the materials and tools required for assembly. This will ensure a smooth and enjoyable crafting experience. So, let’s dive into what you’ll need to bring this solar powerhouse to life!
Shoe Box And Other Necessary Materials
The core of our solar oven is a common household item — the shoe box. Alongside this, a few other materials will be instrumental in crafting your solar oven. Ensure these materials are available:
- Shoe box, preferably with a lid, to serve as the oven’s body
- Aluminum foil to reflect and concentrate the sun’s rays
- Black construction paper to absorb heat
- Clear plastic wrap to create an insulated window for sunlight
- Newspaper, to insulate and maintain the oven’s temperature
- Straw or thin stick, used for propping the lid at the right angle to catch the sun
Tools Required For Assembly
Now that you have all the materials set, let’s look at the tools you’ll need to assemble your DIY solar oven:
- Scissors or a box cutter to cut and shape the box
- Non-toxic glue or double-sided tape to attach the aluminum foil
- Marker to outline where you’ll cut
- Ruler to help make straight lines and measure
- Skewer or nail, to poke holes needed for ventilation and props
With these tools on hand, the solar oven assembly will be a hassle-free task. Keep them within reach and prepare for a step-by-step guide to creating your eco-friendly solar cooker.

Credit: www.pinterest.com
Step-by-step Assembly
Welcome to the eco-friendly DIY project that harnesses the power of the sun! Building a solar oven with a shoebox is not only a fun and educational experience, but it’s also a step toward sustainable living. Follow this simple step-by-step assembly guide to turn a simple shoebox into a fully functional solar oven, perfect for teaching kids about renewable energy or trying out solar cooking on a small scale. Equip yourself with a shoebox, some aluminum foil, and a few more household items – let’s start crafting!
Preparing the shoe boxPreparing The Shoe Box
To ensure your solar oven reaches optimal temperatures, start with proper preparation of the shoebox. Here’s what you need to do:
- Clean the shoe box thoroughly to remove any debris or stickers that might affect the oven’s efficiency.
- Measure and cut out a flap on the lid of the shoe box, leaving at least a one-inch border around the edges. This flap will later reflect sunlight into the box.
- Reinforce the edges of the flap and the shoe box with some tape to secure them against the heat and frequent use.
Adding Reflective Materials
The key to an effective solar oven is its ability to reflect and retain heat. Thus, adding reflective materials is crucial. Here’s how:
- Line the inner sides of the shoe box with aluminum foil, shiny side up, using non-toxic glue to keep it in place.
- Attach a layer of clear plastic wrap or a glass sheet on the underside of the lid to trap the sun’s heat inside the box. Make sure it’s tight and secure to prevent heat from escaping.
- Cover the inner side of the flap you cut earlier with aluminum foil as well. This will serve as a reflector, directing more sunlight into your box.
Building The Solar Oven
With the preparations complete, assembling the solar oven is the final step. Stick to the following process for the best results:
- Position your shoe box on a level surface where it will receive maximum sunlight.
- Angle the reflective flap you created so that it directs sunlight into the box. You can use a stick or a straw to hold the flap in the correct position.
- Place your cooking tray or dish inside the box. Black pots or pans are ideal as they absorb heat more efficiently.
- Seal the opening of the shoe box with the plastic wrap or glass layer you attached earlier to retain the collected heat.
- You can monitor the temperature inside by inserting a thermometer through a small hole. Opt for a hole that’s small enough to prevent heat loss.
- Align the whole setup towards the sun for maximum exposure and wait for your solar oven to heat up. Cooking times will vary based on the sunlight’s intensity and the type of food being cooked.
Using And Testing Your Solar Oven
Your homemade solar oven is now ready for a fun and eco-friendly cooking experiment. Using solar power to cook is not only a great way to engage with renewable energy but also to enjoy some delicious food! Let’s dive into the exciting phase of using and testing your new solar oven made from a humble shoe box.
Preparing Food For Cooking
Before you begin cooking with your solar oven, preparation is key. Remember, this is not your traditional oven, so the cooking process will differ.
- Select foods that cook well with slow and even heat. Great options include hot dogs, marshmallows, or chocolate for s’mores. Baked goods like cookies or simple bread recipes also work well.
- Use shallow, dark-colored containers for the food. Dark surfaces absorb more sunlight, speeding up the cooking process.
- If possible, cut food into smaller pieces. This ensures a more uniform cook.
- Wrap your containers with clear plastic wrap. This helps retain moisture and create a greenhouse effect for a faster cooking time.
Monitoring And Adjusting The Oven’s Position
Once you place your prepared food inside the solar oven, the real magic begins. Monitoring and adjusting your oven is crucial for effective solar cooking.
- Position your solar oven so that it faces directly towards the sun. Maximum sunlight ensures better heat buildup.
- Use a thermometer to gauge the internal temperature of the oven. Aim for a temperature between 200°F and 250°F, which is ideal for cooking most foods.
- Adjust the oven’s position every 30 minutes to maintain direct sunlight on the reflective surface. A simple reorientation can make a significant difference in temperature.
- For precise cooking, you may need to prop up one side of the oven using a block or stone to follow the sun’s trajectory.
Patience is essential; your first attempt at solar cooking will be a learning experience. Expect to allow twice as much cooking time as a conventional oven. So, revel in the process, and soon enough, you’ll be enjoying warm, sun-cooked treats straight out of your shoe box oven.
Safety And Maintenance
When diving into the DIY world of making a solar oven with a shoe box, it’s crucial to think about safety and maintenance. These handheld sun harnessers can reach temperatures sufficient to cook food, which is why understanding the risks and proper care is paramount. Let’s walk through the precautions necessary to use your solar oven safely and the best practices to maintain its longevity, ensuring you get the most out of your eco-friendly creation.
Precautions While Using A Solar Oven
Using a solar oven is exciting, but it calls for mindfulness to prevent accidents. Follow these guidelines to enjoy your homemade device safely:
- Supervision is key – Always monitor the solar oven, especially when children are around.
- Wear protective gloves – Handle hot materials with thermal gloves to avoid burns.
- Secure placement – Place the solar oven on a stable surface to prevent tipping over.
- Focus on food safety – Use a food thermometer to ensure your meal reaches a safe temperature.
Maintaining Your Solar Oven For Longevity
A well-maintained solar oven can provide years of service. Adhere to these maintenance tips:
| Action | Benefit |
|---|---|
| Clean regularly | Prevents buildup and maintains efficiency |
| Check for wear and tear | Early detection of damage ensures timely repair |
| Store properly | Protects from adverse weather and prolongs lifespan |
| Reflector adjustment | Ensures maximum sunlight reflection for better cooking |
Regular inspections and cleaning will keep your solar oven performing at its peak. Remember, the lifespan of your solar oven heavily relies on how well you take care of it. Keep it dry, handle with care, and store it safely after each use.
Frequently Asked Questions For How To Make A Solar Oven With A Shoe Box
Can You Make A Solar Oven With A Shoebox?
Yes, you can construct a solar oven using a shoebox by lining it with reflective materials and creating a sunlight-capturing opening.
How To Make A Simple Solar Oven?
To make a simple solar oven, gather a cardboard box, aluminum foil, plastic wrap, and tape. Line the box interior with foil, creating a reflective surface. Seal the top with clear plastic wrap to trap heat, and angle the box towards the sun.
How To Build A Solar Oven With A Cardboard Box?
To build a solar oven with a cardboard box, line the inside with aluminum foil for reflection. Cut a flap on the top, cover it with clear plastic wrap to create a greenhouse effect, and aim it toward the sun.
Place food inside and monitor the temperature.
How Do You Make A Solar Oven Out Of A Cereal Box?
To make a solar oven from a cereal box, cut a flap in the lid, line it with aluminum foil, then seal the box with plastic wrap. Place your food inside, and aim the reflective flap at the sun to cook.
Conclusion
Crafting your own solar oven from a shoe box is an eco-friendly triumph. It empowers DIY enthusiasts and promotes sustainable living. With just simple materials and a bit of creativity, you’ve stepped into the world of renewable energy. Share your success and insights, inspiring others to embrace this sun-powered cooking adventure.
Let’s spread the light!