
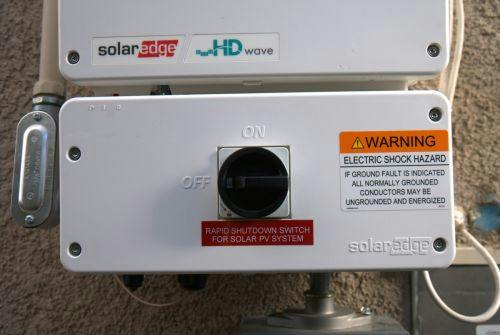
To turn on a SolarEdge inverter, press the “On/Off” switch on the bottom edge to the “On” position. Ensure the inverter screen lights up, indicating it is operational.
Solar energy, a cornerstone of sustainable living, is harnessed effectively with the adoption of SolarEdge inverters. These devices, pivotal for converting DC power generated by solar panels into AC power for home use, are user-friendly and designed for maximum efficiency.
Learning to activate your SolarEdge inverter is a simple yet crucial step in benefiting from solar technology. With just a simple switch, homeowners can initiate the process of clean energy production, setting the stage for reduced electricity bills and a diminished carbon footprint. Familiarity with the operation of your inverter ensures not just economic gains but also contributes to a greener future.

Credit: m.youtube.com
Initial Safety Precautions
Ensuring the correct setup and safety when operating a SolarEdge Inverter is crucial for both performance and longevity. Before the thrill of harnessing solar energy begins, attending to safety measures is paramount. Follow these steps to guarantee a secure environment for turning on your SolarEdge Inverter for the first time.
Confirm proper installation
Confirm Proper Installation
Double-checking the installation is the first step in safety. This procedure involves several critical checks:
- Secure Mounting: Ensure the inverter is mounted securely on a stable surface, with all bolts and supports in place.
- Appropriate Environment: Confirm that the installation site is free from excessive dust and protected from direct sunlight and extreme weather conditions.
- Electrical Connections: All electrical wiring must adhere to local electrical codes. Examine for any loose wires or improper connections.
- Grounding: Verify that the inverter grounding is completed properly to prevent electrical hazards.
Review manufacturer guidelines
Review Manufacturer Guidelines
Consulting the manufacturer’s guidelines before powering on the inverter is not just suggested—it’s essential. SolarEdge provides detailed user manuals and installation guides that include:
- Step-by-step instructions for safe startup procedures.
- Maintenance tips to ensure optimal performance.
- Troubleshooting advice for identifying and addressing common issues.
Verify the absence of water or other hazards
Verify Absence Of Water Or Other Hazards
Before activation, conducting a thorough review of any potential hazards is a crucial step. A key focus should be on:
| Area | Checklist |
|---|---|
| Water Exposure: | Ensure no signs of moisture or water ingress in or around the inverter, which could cause electrical shorts or corrosion. |
| Debris and Obstructions: | Clear any foreign objects that can obstruct airflow or cause overheating. |
| Pest Intrusion: | Inspect for any evidence of pests that can damage the wiring or other inverter components. |
Implement these safety measures before turning on the inverter to ensure a safe and successful start-up.
Understanding Inverter Components
Welcome to the heart of your solar power system: The SolarEdge inverter. Understanding the components of your inverter not only helps ensure proper setup but also guarantees peak performance throughout its operation. Let’s delve into the identifiable parts, revel in the significance of the power optimizer, and explore the display and control interface.
Identifying Inverter Parts
Every SolarEdge inverter is comprised of several key components. Familiarity with these parts is crucial for troubleshooting and system management. Here’s a rundown of the main elements:
- DC Input Terminals: These are the connecting points for solar panel outputs.
- AC Output Terminals: This is where the inverter connects to your home’s power grid or electrical box.
- Inverter Switch: This switch controls the inverter’s operation, allowing users to turn the system on or off manually.
- Grounding Terminals: These points ground the inverter, ensuring safety and performance.
- Communication Interface: This component allows for monitoring and controlling inverter functions through the internet or a local network.
Importance Of The Power Optimizer
The power optimizer is a pivotal element in a SolarEdge inverter setup. It performs maximum power point tracking (MPPT) for individual panels, which leads to:
- Maximization of energy output from each solar panel
- Reduction in power losses due to shading or mismatch
- Enhanced efficiency and performance of the overall system
Integrating power optimizers within your solar array translates into a more resilient energy production unit, resistant to common issues that can impair solar efficiency.
Display And Control Interface Overview
The display and control interface of a SolarEdge inverter embodies the user’s central hub for system management. This interface comprises:
- LCD Screen: Provides real-time data and system statuses.
- Buttons: These allow users to navigate menus and modify system parameters.
- LED Indicators: Offer at-a-glance system performance feedback.
This interface is integral for direct interaction with the inverter, presenting vital information that includes energy production, system faults, and performance trends. Regular monitoring ensures the solar array functions optimally, minimizing downtime and maximizing energy yield. Dive into your SolarEdge inverter’s control panel to truly take charge of your solar energy system.
Pre-startup Checklist
Before the excitement of powering your home with solar energy takes over, it’s crucial to perform a thorough pre-startup checklist for your SolarEdge inverter. This essential step ensures that the system is safe, efficient, and ready for operation. By meticulously going through the checklist, you can look forward to enjoying the benefits of your investment with confidence. Let’s walk through the essential pre-startup inspections.
Inspecting for clear error indicators
Inspecting For Clear Error Indicators
The first step in the pre-startup checklist involves a keen eye. Check the inverter for any visible error indicators that could signal immediate issues. This includes inspecting the inverter’s display and status lights. If any warning signs are present, it’s important to troubleshoot these before proceeding. The manual accompanying your SolarEdge inverter contains a list of potential error codes and their meanings for effective resolution.
Ensuring electrical connections are secure
Ensuring Electrical Connections Are Secure
Next on the checklist is verifying that all electrical connections are properly secured. Solar inverters involve complex wiring, and ensuring each connection is not just tight but also correctly wired is paramount. Loose connections can lead to inefficiencies or, worse, pose a safety risk. Gently tug on wires and check terminal screws to confirm that they are snug. Additionally, inspect the inverter’s input and output wires to ensure they adhere to your local electrical codes.
Confirming proper grounding
Confirming Proper Grounding
Lastly, grounding is a critical component of any electrical system, especially for solar PV systems exposed to the elements. Proper grounding protects both the system and your home from electrical faults. Confirm that the grounding wire is firmly attached to both the inverter and your home’s grounding system. This not only ensures safety but is also a requirement for system compliance with national electrical standards.
- Visual Indicators: Ensure LED indicators show normal operation with no fault lights.
- Wiring connections: Check for tightness and correct installation.
- System grounding: Verify that grounding connections adhere to the National Electrical Code (NEC).
To summarize, a thorough pre-startup inspection of your SolarEdge inverter should focus on checking for error indicators, ensuring all wiring connections are secure, and verifying proper grounding. Do not proceed with turning on the inverter if any issues are detected; resolve them first or seek professional assistance.
Meta Title: How to Turn on SolarEdge Inverter: Pre-Startup Checklist Guide
Meta Description: Learn the essential steps to ensure your SolarEdge inverter is ready for operation with our comprehensive pre-startup checklist guide. Ensure safety and efficiency today!
Targeted Keywords: SolarEdge inverter, pre-startup checklist, inverter error indicators, electrical connection security, proper grounding, solar PV system setup
Energizing The Inverter
Welcome to our step-by-step guide on Energizing the Inverter. After having your SolarEdge inverter installed, the final step is energizing it to begin harnessing the sun’s power efficiently. This process involves a series of straightforward actions to ensure your inverter operates correctly and safely. In this guide, you’ll learn exactly what to do to turn on your SolarEdge inverter and what to expect during its initial startup.
Steps To Switch On The AC and DC Disconnects
The first stage in energizing your inverter is to turn on the AC and DC disconnects. Follow these instructions carefully:
- Locate the DC disconnect switch, usually found at the bottom of the inverter.
- Ensure that the switch is in the OFF position before proceeding.
- Flip the DC disconnect to the ON position to establish the DC power flow from your solar panels to the inverter.
- Next, locate the AC disconnect. This could be an external switch separate from the inverter depending on your installation setup.
- Turn the AC disconnect to the ON position, establishing the connection to your home’s electrical grid.
With both disconnects on, you’ve successfully provided a clear path for electricity to flow through your SolarEdge inverter.
Observing The Inverter’s Self-test Sequence
Once the disconnects are activated, your inverter will begin a self-test sequence. What to observe:
- The inverter’s screen will light up, displaying the start-up wizard.
- It will check internal components and configurations.
- A series of messages and codes might appear, which indicate the system’s status.
- Patience is key, as this process can take a few minutes to complete.
Ensure that all readings are normal and no errors are displayed before proceeding to the final step.
What To Expect During The Initial Startup
During the initial startup of your SolarEdge inverter, consider the following:
- The inverter might take a moment to begin inverting DC to AC power.
- Listen for a click sound, which indicates the internal relays are engaging.
- The display should show real-time data on power generation and system status.
- The initial operation allows the system to calibrate and stabilize.
After these steps, your inverter’s green light should be on, signaling normal operation and the successful energizing of your SolarEdge inverter.
Post Activation Monitoring
After successfully turning on your SolarEdge inverter, the journey towards energy proficiency does not end. It’s critical to monitor your system to ensure it runs optimally. Post-activation monitoring involves accessing and interpreting inverter readings, setting up the SolarEdge monitoring platform, and swiftly addressing any common issues you might encounter. Keep your SolarEdge inverter performing at its best by following these essential steps:
Accessing And Interpreting Inverter Readings
Your SolarEdge inverter is a hub of information. Learning to interpret its readings is vital for system health and energy management. Activate the display on your inverter by pressing the light button or screen and navigating through the menus to find these key metrics:
- Current power output: Indicates how much power is being generated in real-time.
- Energy production: Data on daily, monthly, and lifetime energy production.
- System status: Displays the operational status and alerts you to any faults.
Regular check-ins will familiarize you with your system’s performance patterns, making it easier to spot any deviations from the norm.
Setting Up Solaredge Monitoring Platform
To elevate your monitoring capabilities, setting up the SolarEdge monitoring platform is a game-changer. It provides a comprehensive view of your system’s performance through an intuitive interface. Follow these steps to get started:
- Register your system on the SolarEdge monitoring portal.
- Download the SolarEdge app on your smartphone for on-the-go monitoring.
- Ensure your inverter is connected to the internet to transmit data.
- Set up alerts and notifications for real-time issue detection.
With the SolarEdge platform, you can track your system’s performance, and environmental impact, and even compare it with other systems in your area.
Immediate Troubleshooting Tips For Common Issues
Encountering issues with your inverter can be concerning, but many common problems have simple solutions. Here are immediate troubleshooting tips:
| Issue | Cause | Solution |
|---|---|---|
| No AC connection | Grid or inverter connection issue | Check grid connection, circuit breakers, and switchboard |
| No grid connection | Grid outage or inverter fault | Wait for the grid to resume, and restart the inverter if needed |
| Error codes on display | Various potential issues | Refer to the manual for specific code explanations and actions |
Be proactive in resolving alerts and maintain your inverter’s efficiency. If a problem persists, contact a certified SolarEdge technician immediately.
Note: This guide assumes you have a working knowledge of your SolarEdge inverter’s features. If uncertain, consult the user manual or a professional installer for more detailed instructions and safety information.
Frequently Asked Questions
Can A Homeowner Easily Start A Solaredge Inverter?
Absolutely. Turning on a SolarEdge inverter is generally straightforward. First, make sure that the AC and DC disconnects are in the ‘ON’ position. Then, check the inverter’s LCD screen for any error messages and follow the on-screen prompts.
What Are The Initial Steps To Power Up Solaredge?
To power up a SolarEdge inverter, begin by checking all electrical connections. Confirm the DC disconnect switch, usually located at the bottom of the inverter, is set to ON. Then, switch on the AC disconnect to initiate the start-up sequence.
How Long Does Solaredge Inverter Startup Take?
SolarEdge inverters typically start-up swiftly, usually within a few minutes. Following the correct startup procedure, the inverter should quickly reach operational status, as indicated by the green LED light and the inverter’s display.
What Safety Precautions Should I Take Before Turning On My Inverter?
Before activating your SolarEdge inverter, ensure all covers are secured. Maintain a safe distance from the inverter to avoid contact with live electrical components. Always wear appropriate personal protective equipment.
Conclusion
Turning on your Solaredge inverter is straightforward with these steps. Ensuring your system’s optimal performance is now within reach. Remember, safety is paramount; always consult your manual. For more solar tips, keep browsing our blog. Harness the sun’s power efficiently and confidently.