
To make a solar oven for kids, gather a cardboard box, aluminum foil, plastic wrap, and black construction paper. Next, insulate the box with foil, create a window with plastic wrap, and coat the base with black paper to absorb heat.
Creating a solar oven can be an enjoyable and educational activity that teaches kids about renewable energy and the power of the sun. With simple household items and a sunny day, you can transform a pizza box or a cardboard box into a functioning solar cooker.
This mini science experiment is an excellent opportunity for children to learn about sustainability, science, and the basics of cooking. By making a solar oven, kids not only engage in a fun craft but also get to witness the principles of solar energy in action, making it a perfect project for school science fairs or a hands-on weekend activity. With this guide, you’ll empower youngsters to cook with the sun’s rays while understanding the importance of eco-friendly practices.
Solar Oven Basics
Welcome to the wonderful world of solar cooking! Before we dive into the steps of making a solar oven that’s perfect for young scientists and environmentalists alike, let’s understand some solar oven basics. A solar oven harnesses the sun’s energy to cook food or melt s’mores, teaching kids about renewable energy and science in a practical, hands-on way. Let’s get started on this enlightening project!
Understanding solar ovens
Understanding Solar Ovens
A solar oven, simply put, is a device that converts sunlight into heat to cook food. They are typically constructed using materials that reflect and absorb sunlight, like aluminum foil and black paint. The interior of a solar oven gets hot and then slowly cooks the food inside it, similar to a conventional oven. A few key components include:
- A reflective surface to focus the sunlight.
- An absorptive surface to convert sunlight into heat.
- An airtight space to retain the heat.
- Insulation to minimize heat loss.
Understanding these components can help kids grasp the fundamentals behind renewable energy sources, their uses, and how simple scientific principles can have practical, everyday applications.
Benefits of making a solar oven
Benefits Of Making A Solar Oven
Making a solar oven with kids is not just an engaging activity, but it also comes with several noteworthy benefits:
- Educational Value: Kids learn about science, particularly physics and environmental studies, through building and using the oven.
- Environmental Awareness: Teaches the importance of renewable energy and how it can reduce our ecological footprint.
- Energy Savings: Using a solar oven reduces the need for conventional cooking energy sources like electricity or gas.
- Safe Cooking: Solar ovens cook at lower temperatures, reducing the risk of burns or fires.
- Fun with Food: It opens up opportunities for kids to experiment with recipes and enjoy the outdoors.
Building a solar oven is an inspiring way to motivate children to think creatively while learning about the power of the sun and sustainability in a hands-on project.
Materials Needed
Gathering Your Supplies for a Stellar Solar Oven Project
Embarking on a DIY solar oven project with kids is not only a delightful afternoon activity but also a great learning opportunity. Understanding the science of solar energy can be both fun and fascinating! Before we engineer our eco-friendly contraption, let’s make sure we have all the right materials on hand. You’ll be surprised at how simple household items can transform into a functional solar cooker. Here’s what you’ll need:
Cardboard Box
The body of your solar oven will be a sturdy cardboard box. Opt for one with flaps you can prop open as reflectors. The size of the box is flexible, but a larger box can capture more sunlight, speeding up the cooking process.
Aluminum Foil
Aluminum foil’s reflective surface is perfect for directing those precious sunbeams into your box. It’s a crucial component for the efficiency of the oven, so make sure you have enough to cover the inner walls and flaps of the cardboard box.
Plastic Wrap
For the oven’s window, you’ll need clear plastic wrap. This will trap the sun’s warmth while allowing light to pass through. Ensure the wrap is tight and sealed to maintain the oven’s heat.
Black Construction Paper
Black construction paper absorbs heat extraordinarily well. Line the bottom of your solar oven with it to help heat the interior. Its dark color converts sunlight into thermal energy, cooking your food more effectively.
Insulating Materials
Last on the list are insulating materials. These can be something as simple as rolled-up newspapers, cloth, or even straw. They’ll be packed around the sides of the box to minimize heat loss.
Each of these materials plays a pivotal role in capturing and retaining solar energy. With these at the ready, you’re all set for an exciting project that will turn a bright sunny day into a mouth-watering cooking experience!
Building Your Solar Oven
Constructing a solar oven is a phenomenal project that combines fun and learning for kids. It teaches them about renewable energy, sustainability, and basic scientific principles. The joy on their faces, along with the sense of accomplishment they feel when they cook their first solar-powered meal, is priceless. Let’s guide our young scientists through the steps to build their very own solar oven!
Step By Step Instructions
Building a solar oven is straightforward, and you probably have most of the materials lying around your home. Follow these instructions:
- Gather Materials: You’ll need a pizza box, aluminum foil, clear plastic wrap, black construction paper, a stick or straw to prop the lid, and tape.
- Prepare the Pizza Box: Cut a flap in the lid of the pizza box, leaving about an inch around the edges to create a window.
- Line the Flap: Cover the inner side of the flap with aluminum foil to reflect sunlight. Make sure the foil is smooth and shiny.
- Create the Window: Seal the opening created from the flap with clear plastic wrap to form an airtight window for sunlight to enter. Secure it with tape.
- Insulate the Bottom: Line the bottom of the box with black construction paper to absorb heat. The black surface is key to maximizing heat absorption.
- Add Insulation: For better heat retention, roll up sheets of newspaper and place them inside the box, creating a border around the cooking area.
- Seal the Oven: Close the lid and prop it open using a stick or straw. Ensure that the foil reflects the sunlight into the box through the plastic wrap window.
- Test It Out: Place the oven outside in direct sunlight and cook some simple foods, like s’mores or hot dogs, to test its effectiveness.
Incorporating Kids In The Construction
Getting kids involved in the construction process not only keeps them engaged but also provides a great learning experience. Here’s how:
- Assign Roles: Every child can have a specific role, such as cutting, taping, or measuring. This builds teamwork and responsibility.
- Supervision: Guide them through each step, ensuring they understand the importance of each component and its role in the oven’s function.
- Experimentation: Encourage kids to make predictions about the solar oven’s performance and observe the outcomes, fostering critical thinking.
- Decoration: Let them decorate the oven’s exterior, personalizing the project and sparking creativity.
With each step, ensure the children’s safety by supervising the use of any sharp tools or when they handle materials like the aluminum foil that can have sharp edges.
Enjoy this eco-friendly cooking adventure, and get ready to savor delicious treats made with the power of the sun!
Using The Solar Oven
Welcome to the exciting world of solar-powered cooking! Now that you’ve created your very own solar oven with your kids, it’s time to harness the power of the sun and cook some delicious treats. But, before we dive into using your solar oven, we need to discuss some important safety precautions and tips on how to monitor and adjust temperatures effectively for the best solar-cooked experience. Let’s start cooking with sunlight!
Safety Precautions
Safety comes first, especially when kids are involved in cooking activities. Using a solar oven is generally safe, but there are a few key precautions to keep in mind:
- Direct Sunlight: Solar ovens require direct sunlight to function. Ensure kids are protected with sunscreen and have proper eye protection against glare.
- Hot Surfaces: The oven can get surprisingly hot. Teach children to not touch the oven’s interior or the cooking pot without adult supervision.
- Food Handling: Just like with traditional cooking, remind kids about proper food handling and hygiene to prevent illnesses.
Monitoring And Adjusting Temperatures
One of the most engaging parts of using a solar oven is learning how to control the temperature. Solar cooking is a fantastic way for kids to learn about renewable energy and the science behind cooking. Here are some tips:
- Use a Thermometer: Place an oven-safe thermometer inside your solar oven to monitor the temperature accurately.
- Angle Towards the Sun: Adjust the oven’s placement so it’s facing the sun directly for maximum heat absorption. This might require realignment every couple of hours.
- Reflective Surfaces: If the oven isn’t getting hot enough, consider adding or adjusting reflective surfaces to increase the concentration of sunlight.
As the sun moves across the sky, you’ll need to readjust the oven’s position periodically to maintain the optimal temperature. Encourage kids to keep a log of temperature changes and cooking times for different dishes. This hands-on experience is not only a fun activity but also educational, teaching kids about energy conservation and sustainable living.
Solar Cooking Activities For Kids
Embrace the power of the sun and turn a bright day into an educational and fun cooking experience with your kids! Solar ovens are not only a great way to teach young ones about renewable energy, but they also provide a platform for engaging them in cooking their own snacks. By harnessing the sun’s rays, children can watch science in action as their food simmers or bakes to perfection. Get ready for an adventure in your backyard or any sunny spot where creativity and solar energy come together deliciously!
Simple Recipes For Solar Cooking
Begin with some simple and child-friendly recipes that are perfect for solar ovens. These recipes ensure safety as there are no open flames or hot surfaces that little hands might accidentally touch. Here’s a few to get you started:
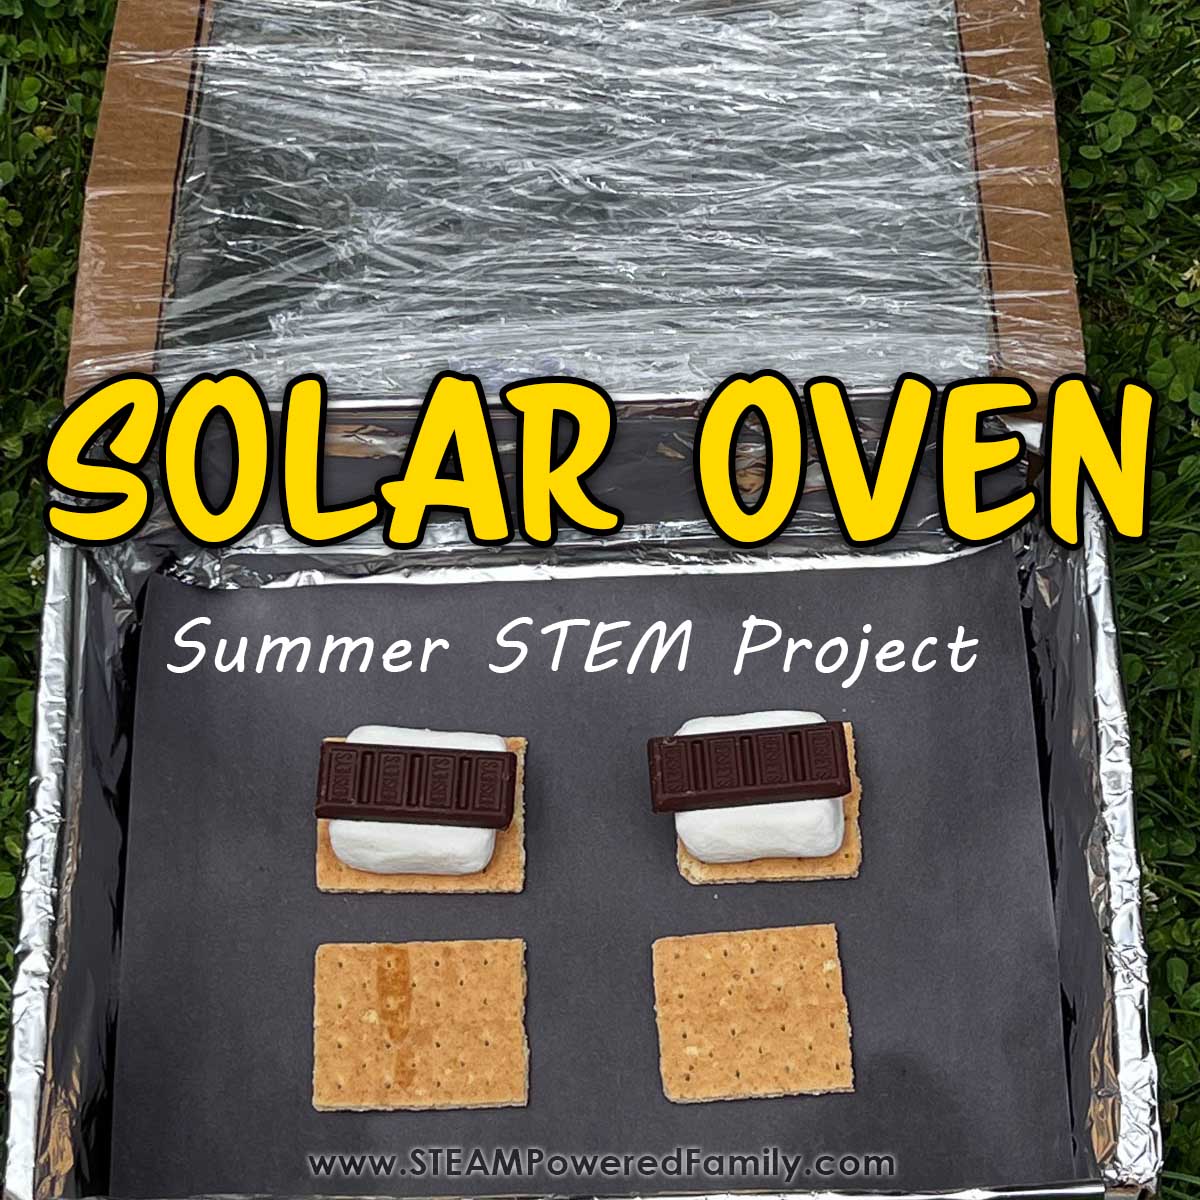
- S’mores: Solar ovens provide just the right amount of heat to melt chocolate and marshmallows sandwiched between graham crackers.
- Nachos: Layer chips with cheese and any other favorite toppings for a cheesy, melty treat.
- Sunshine Eggs: Crack an egg into a small, shallow dish, and let the sun’s warmth cook it to a sunny-side-up finish.
These recipes are simple enough to not overwhelm kids, but engaging enough to pique their curiosity about the cooking process.
Educational Opportunities During Solar Cooking
As the oven soaks in the rays, there are valuable lessons to be learned. Here’s a list of educational opportunities to explore:
- Understanding Renewable Energy: Discuss the concept of solar power and how it differs from non-renewable energy sources.
- Weather and Climate: Teach kids about the importance of sunlight and how weather conditions affect the cooking time and process.
- Scientific Observation: Encourage children to make predictions, monitor their food’s progress, and document their findings.
These activities not only provide a hands-on cooking experience but also align beautifully with STEM education, nurturing curious minds through play and discovery.
Credit: www.steampoweredfamily.com
Frequently Asked Questions
How To Make A Solar Oven Easy For Kids?
Gather a pizza box, aluminum foil, plastic wrap, black construction paper, and tape. Line the box with foil, place the paper inside as a base, cover the opening with plastic, and tape it shut. Your simple solar oven is ready for a sunny day to experiment with kids.
How To Make Your Solar Oven?
To make a solar oven, gather a cardboard box, aluminum foil, plastic wrap, black construction paper, and glue. Line the inside of the box with foil. Glue black paper to the base for heat absorption. Cover the opening with plastic wrap for insulation and focus sunlight inside.
How To Make A Solar Oven Out Of A Cardboard Box?
To build a solar oven: 1. Cut a flap in the box’s lid. 2. Line with aluminum foil. 3. Glue black construction paper inside the box. 4. Insulate with rolled-up newspapers. 5. Place food inside and aim at the sun.
How Does A Solar Oven Work Kids?
A solar oven uses the sun’s rays to heat food. Reflective surfaces direct sunlight into a concentrated area, cooking the contents inside.
Conclusion
Crafting a solar oven with your children can be a joyful, enlightening project. It offers practical science lessons and eco-friendly cooking fun. Remember to supervise and encourage safety above all. We hope you relish the sunny days and homemade treats with your solar-powered creations.
Happy cooking and learning!