
To build a solar oven, gather materials like a cardboard box, aluminum foil, plastic wrap, and an insulating material. Then, construct and insulate the box, add reflective surfaces, and create a clear window for sunlight.
Tapping into the abundant energy of the sun, a solar oven is a remarkable tool that harnesses solar power to cook food or sterilize water. It’s a perfect project for educators, environmentally conscious cooks, or anyone interested in renewable energy and sustainable practices.
Crafting a solar oven involves simple materials and provides a fantastic hands-on experience in the principles of solar gain and insulation. With benefits like reduced energy bills and the ability to cook during power outages or while camping, building a solar oven can be both an educational and practical venture. Embrace the power of the sun for your next cooking adventure by creating a solar oven that’s both efficient and environmentally friendly.
Gathering Materials
Embarking on the journey to create your solar oven not only promises a delightful DIY experience but also paves the way for a greener cooking method. Gathering materials is the critical first step in this eco-friendly project. To ensure success, it’s essential to select items that will maximize heat capture and retention. This section guides you through precisely what you need to kickstart your solar cooking adventure.
Research On Types Of Solar Ovens
Before assembling materials, a deep dive into the types of solar ovens is crucial. Solar ovens come in various designs, each with unique benefits. The most common types include box ovens, panel ovens, and parabolic ovens. Box ovens are beginner-friendly and offer steady heat, making them ideal for most cooking needs. Panel ovens, with their foldable panels, are portable and efficient. Parabolic ovens reach higher temperatures quickly but require more precise construction and alignment. Consider the cooking tasks you wish to accomplish and the convenience level you desire before making a decision.
– table to illustrate types of solar ovens –
| Type of Solar Oven | Description | Use-case |
|---|---|---|
| Box Oven | Insulated box with reflective material | All-around cooking |
| Panel Oven | Foldable panels for reflection | Portability, easy to store |
| Parabolic Oven | Dish-like shape focuses light to a point | Quick heating, requires careful use |
Selecting Appropriate Materials
With an understanding of solar oven designs in hand, you’re now set to choose the right materials. The key to an efficient solar oven lies in materials that have excellent reflective properties and are great at insulating. Here’s what you’ll need:
- Reflective materials: Aluminum foil or reflective mylar are top choices for directing sunlight into your oven.
- Insulation: To retain heat, use materials like polystyrene foam, wool, or fiberglass.
- Glazing: A clear, heat-resistant oven bag or tempered glass trap heat without obstructing sunlight.
- Adhesives: Use non-toxic glues or tapes to assemble parts without health risks.
- Containers: Black cookware absorbs and converts sunlight to heat more efficiently than shiny pots and pans.
Consider durability and sustainability when selecting materials for your solar oven. Aim for recyclable or biodegradable options as much as possible. Local hardware stores or online retailers will often stock most of these items, making them easily accessible. Remember, the quality of materials will directly influence the effectiveness and longevity of your solar oven.
– bullet points arrayed as an ordered list for material collection steps –
- Determine the solar oven type suited to your needs.
- List all the materials required for the specific design.
- Source high-quality, eco-friendly materials.
- Organize all the materials together before beginning the construction process.
Designing The Solar Oven
Embarking on the journey of building a solar oven begins with an essential phase: designing. Crafting an efficient and effective solar cooker hinges on understanding fundamental concepts such as insulation, concentration, and reflection of the sun’s rays. This segment walks you through developing a blueprint and opting for the ideal size and shape to ensure your solar oven sizzles with success. Creating a thoughtful design is not only rewarding but also pivotal for a successful DIY solar oven project.
Creating A Blueprint
Before assembling materials and diving into construction, developing a detailed blueprint is crucial. A blueprint serves as a roadmap, guiding each step and helping to visualize the end product. Begin by considering factors such as the angle of sunlight, the oven’s orientation, and the reflective surfaces. A well-structured blueprint will account for these elements and offer a clear vision for the build phase, ensuring no essential detail is overlooked.
- Identify the purpose of your solar oven – cooking, baking, or both.
- Determine the optimum dimensions based on the intended use.
- Sketch the major components: the cooking chamber, reflectors, and insulation areas.
- Allocate space for additional elements like a thermometer or a handle for opening the oven.
Choosing The Right Size And Shape
Selecting the appropriate size and shape for your solar oven is pivotal to its functional efficiency. A larger oven might accommodate more or bigger dishes, but it requires more materials and a larger area to capture sunlight. Conversely, a smaller oven is more portable but has limited cooking space. Most solar oven enthusiasts find a medium-sized, box-shaped oven to be the sweet spot for versatility and efficiency.
| Size | Suitability | Material Consumption | Sunlight Capture Area |
|---|---|---|---|
| Small | Portability, quick heating | Less | Lower |
| Medium | Versatility, balanced efficiency | Moderate | Optimal |
| Large | Bulk cooking, community use | More | Higher |
Shape plays a significant role too. A box shape is simple to construct and effective. However, a parabolic or curved shape better focuses the sunlight but requires more complex construction techniques. The goal is to reflect and concentrate as much sunlight as possible onto the cooking area. For beginners, a rectangular or cubic shape is recommended for its straightforward build process and reliable performance.
- Rectangular/Cubic: Easy to build, good for beginners.
- Parabolic: Concentrates heat effectively, more complex to construct.
- Panel Cookers: Foldable, very portable, with less heat retention.
Assembling The Solar Oven
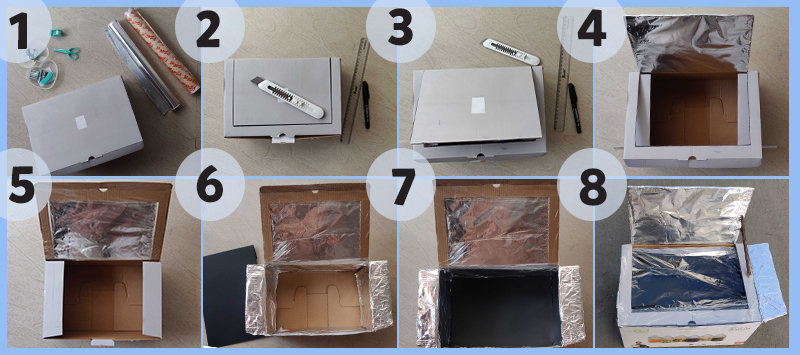
Embarking on the journey of creating a solar oven marks the beginning of an exhilarating project that merges eco-friendliness with the simplicity of outdoor cooking. The stage of assembling your solar oven is where the magic starts to happen, transforming everyday materials into a functional, renewable energy-powered cooker. This step-by-step guide will walk you through constructing the base and adding reflective materials to your solar oven, two pivotal steps that will set the foundation for your sun-powered culinary adventures.
Constructing the base
Constructing The Base
The base of your solar oven is the cornerstone of stability and effectiveness. Start with a sturdy box, preferably made of strong cardboard or wood, that can withstand the high temperatures your oven will reach. Follow these steps to ensure your base is ready for action:
- Choose a box or create a frame: Opt for a size that accommodates the cooking vessels you plan to use.
- Insulate the inside: Line the inside with layers of newspaper or wool to retain heat.
- Seal gaps with aluminum foil tape: This prevents heat from escaping, maximizing your oven’s efficiency.
- Attach a clear cover on top: Cut a piece of tempered glass or oven bag to fit over the opening, allowing sunlight in and trapping heat.
Adding reflective material
Adding Reflective Material
With your base in place, it’s time to focus on the reflective material, crucial for harnessing the sun’s power. The right reflective surface bounces sunlight into your oven, increasing the temperature within. Follow these steps to create an efficient light-capturing environment:
- Acquire reflective materials: Quality mirrors, aluminum foil, or reflective Mylar sheets work best.
- Cut to fit: Measure and trim your material to cover the inner walls of the box completely.
- Fasten securely: Use non-toxic glue, double-sided tape, or fasteners to attach the reflective material without compromising the interior insulation.

Credit: www.pinterest.com
Testing And Using The Solar Oven
Embarking on a solar cooking adventure is as exciting as it is rewarding. After meticulously constructing your solar oven, the crucial moment has arrived – testing and using your eco-friendly creation. Let’s dive into the steps to ensure your solar oven not only reaches the desired temperature but also cooks a meal to perfection.
Conducting Temperature Tests
To gauge the effectiveness of your solar oven, conducting temperature tests is essential. These tests will help determine the oven’s ability to harness sunlight and convert it into heat. Use a reliable oven thermometer and place it inside your solar oven, making sure it is in a position that allows you to read it without opening the lid frequently, as this would let the heat escape.
- Choose a sunny day with minimal cloud coverage for accurate results.
- Preheat the oven by allowing it to stay in direct sunlight for at least 30 minutes before the test.
- Monitor the thermometer every 15 minutes and record the temperatures for one hour.
- Verify that the internal temperature reaches at least 150°F (65°C), a basic threshold for cooking most foods.
Remember, the type of food you plan to cook may require higher temperatures. Ensure your solar oven design can reach those temperatures consistently for the best cooking results.
Preparing And Cooking Food
Once your solar oven passes the temperature test, it’s time to prepare for the culinary action. Solar cooking takes longer than conventional methods, so patience is key. Choose recipes that are forgiving with cooking times, such as stews, roasts, or vegetables.
| Food Item | Approximate Cooking Time |
|---|---|
| Vegetables | 1-2 hours |
| Chicken | 2-4 hours |
| Rice | 1-2 hours |
| Cookies | 1-2 hours |
Preheat your solar oven before placing your food inside — this can significantly reduce cooking time. Position the food containers in a manner that ensures they receive uniform sunlight. If necessary, adjust the oven’s angle periodically to follow the sun’s trajectory for consistent heating.
Remember to:
- Cut food into smaller pieces if you want it to cook faster.
- Use dark-colored cookware for better heat absorption.
- Seal food well to retain moisture and flavors.
- Rotate the dish occasionally to ensure even cooking.
Finally, always use oven mitts or thick gloves when handling cookware in the solar oven; they can get as hot as they would in a conventional oven. With a bit of solar savvy and food safety knowledge, you’ll be ready to enjoy the fruits of your labor courtesy of the sun!
Maintenance And Care
Proper maintenance and care are crucial for the longevity and efficiency of your solar oven. A well-maintained solar cooker not only guarantees consistent cooking results but also extends the life span of the unit. Below, explore detailed tips on how to keep your eco-friendly appliance in top condition through proper cleaning, storage, and regular upkeep.
Cleaning And Storage Tips
Keeping your solar oven clean and properly stored when not in use is essential. Dirt and residue can affect the solar oven’s ability to absorb sunlight, which can result in decreased cooking efficiency. Follow these simple steps to maintain its cleanliness:
- Avoid harsh chemicals: Use mild, soapy water and a soft cloth to wipe down the interior and exterior surfaces.
- Dry thoroughly: After cleaning, make sure the solar oven is completely dry before storage to prevent mold and mildew.
- Protective covering: Use a protective cover or store the oven in a cool, dry place away from direct sunlight and rain to prevent damage when not in use.
- Reflective panels: Take special care when cleaning the reflective panels as scratches can diminish their effectiveness. Gently clean with a soft, damp cloth.
By adhering to these cleaning and storage recommendations, you can ensure your solar oven remains pristine and ready for your next sun-powered cooking adventure.
Regular Upkeep For Optimal Performance
Regular upkeep involves more than just cleaning. It encompasses all necessary adjustments and checks that keep your solar oven functioning at its best. Here’s what to focus on:
- Check for damage: Before each use, inspect your solar oven for any signs of wear and tear such as cracks, breaks, or loose components.
- Tighten up: Make sure all screws and fasteners are tight to prevent heat loss and structural instability.
- Reflective surface maintenance: Polish the reflective surfaces occasionally to maintain their shine and maximize the concentration of sunlight.
- Seasonal adjustments: Be mindful of the changing position of the sun throughout the seasons and adjust the angle of the oven and reflectors accordingly for maximum efficiency.
Regular checks and minor adjustments are the keys to sustaining the solar oven’s peak performance and ensuring the most efficient use of the abundant energy provided by the sun.
Frequently Asked Questions
How To Make A Simple Solar Oven?
Gather a cardboard box, aluminum foil, plastic wrap, and tape. Line the box interior with foil. Cover the opening with plastic wrap. Place in sunlight; cook food inside.
What Are The Requirements To Make A Solar Oven?
To build a solar oven, gather reflective materials, insulating containers, clear plastic or glass, and black cookware. Ensure stable, sun-facing construction for optimal heat absorption and retention.
How Did They Make A Solar Oven?
They built a solar oven by insulating a box and covering it with reflective materials to focus sunlight, cooking food with the captured heat.
Do Diy Solar Ovens Work?
Yes, DIY solar ovens are effective at using sunlight to cook food, though cooking times are typically longer than conventional methods. They are eco-friendly and cost-effective solutions for outdoor cooking.
Conclusion
Embracing solar cooking is a game-changer for both your wallet and the planet. Our step-by-step guide has equipped you with the know-how to craft your solar oven. Fire it up, experiment with recipes, and enjoy the sun’s bounty. Simplicity meets sustainability; it’s time to let your culinary creativity shine with renewable energy.
Happy solar cooking!