
To make a solar oven without a pizza box, use a cardboard box and reflective materials like aluminum foil. Seal the box with clear plastic wrap for heat retention.
Crafting an efficient solar oven can be a rewarding DIY project that harnesses the sun’s power for cooking. Understanding the principles behind solar energy conversion is pivotal in creating an effective device. The design involves insulation, reflection, and the greenhouse effect to concentrate heat.
You’ll need everyday items like cardboard, aluminum foil, and plastic wrap. Ideal for educational purposes or outdoor cooking, building a solar oven introduces renewable energy concepts and provides a practical application. Engaging and environmentally friendly, this project encourages sustainability and self-sufficiency. With the right materials and a sunny day, you can bake or cook without conventional electricity or fuel.
Understanding Solar Oven Mechanics
Embarking on the journey of creating a solar oven marks a fascinating exploration into the potential of the sun’s power. Without relying on a conventional pizza box, this venture calls for innovation and a solid grasp of the underlying principles. Understanding solar oven mechanics unveils the sophistication of converting sunlight into thermal energy capable of cooking delicious meals.
Solar Radiation and Its SignificanceSolar Radiation And Its Significance
The sun showers Earth with a constant stream of energy in the form of solar radiation, the driver behind our homemade solar oven’s capability. The magnitude of solar radiation at any given spot significantly impacts the oven’s efficiency. By harnessing this natural power, our solar oven taps into an abundant and renewable energy source, making it a sustainable cooking method.
- Intensity: The amount of sunlight available for capture.
- Duration: Length of exposure to consistent sunlight.
- Angle of Incidence: The angle at which sunlight hits the oven’s absorbing surfaces.
Principles Of Solar Oven Design
A solar oven operates on basic scientific principles converging into an effective design. Each component serves a purpose to maximize the absorption and retention of heat.
| Component | Function | Role in Heat Retention |
|---|---|---|
| Reflective surfaces | Concentrate sunlight | Channel more energy into the cooking area |
| Transparent cover | Allow sunlight in but prevent heat escape | Create a greenhouse effect for temperature buildup |
| Dark cooking surface | Absorb sunlight effectively | Convert light to thermal energy for cooking |
| Insulating materials | Limit heat loss to the surroundings | Maintain high temperatures for a longer duration |
The design integrates these elements to capture solar radiation, convert it into heat, and retain it within the cooking area for optimal performance. Correct manipulation of the angles and materials is crucial for an efficient setup that reaches temperatures high enough to cook food. A thoughtfully constructed solar oven harnesses the sun’s bounty with minimal environmental impact, paving the way to a greener, cleaner cooking experience.
Selecting Materials For Your Solar Oven
Welcome to the fascinating world of DIY solar ovens! Embracing the power of the sun not only puts you in touch with sustainable practices but also offers the joy of creating a functional cooking device from scratch. Whether you’re an eco-enthusiast or a weekend crafter, your journey starts with the all-important step of selecting materials for your solar oven. It’s time to roll up your sleeves and gather the right components that will convert sunlight into culinary heat without relying on a pizza box.
Choosing Heat-absorbing And Insulating Materials
The essence of a solar oven lies in its ability to absorb and retain heat. Choosing the right heat-absorbing materials is crucial for maximum efficiency. Here are the materials to look for:
- Black construction paper or black paint: Black surfaces absorb heat effectively, making them ideal for the interior of your solar oven.
- Heavy-duty aluminum foil: This reflective surface will redirect sunlight towards your cooking area, increasing the oven’s internal temperature.
- Clear plastic wrap or a glass pane: These materials trap heat while allowing sunlight to pass through.
- Thick cardboard, wood, or Styrofoam: Used for the structure, these materials should provide good insulation to prevent heat loss.
When assembling your solar oven, balance is key. A well-insulated structure ensures that the heat doesn’t escape easily, creating a consistent cooking environment.
Assembling The Components
Assembling the components of your solar oven requires careful attention to detail and precision. Follow these steps to put together a functioning solar cooker:
- Cut your chosen insulating material to the desired size for the oven’s exterior. The larger the box, the more you can cook.
- Create an interior cooking chamber by lining it with black construction paper or painting it black; this will be your heat-absorbing surface.
- Glue the aluminum foil onto the inner sides of the lid or another flap to serve as reflectors, directing sunlight into the chamber.
- Seal the cooking chamber with a transparent cover, using either plastic wrap tightly stretched to create a seal or a glass pane to retain the heat.
- Insulate the oven’s exterior by sealing any gaps with extra cardboard pieces, duct tape, or adhesive foam strips.
Your solar oven will now be ready to harness the power of the sun. By carefully selecting and assembling these materials, you can tap into clean energy to bake, roast, or melt delicious treats with ease.
Constructing A Homemade Solar Oven
Constructing a Homemade Solar Oven can be a rewarding DIY project that takes advantage of the sun’s free and abundant energy. Whether for a science project, camping trip, or just to reduce energy costs at home, a solar oven is a useful appliance to have around. This step-by-step guide will walk you through creating your own solar oven from scratch, without the need for a pizza box, commonly used in school projects. By focusing on the construction of a frame and the installation of reflective surfaces, you’ll be well on your way to cooking with the power of the sun!
Crafting The Solar Oven Frame
Begin by building a sturdy frame for your solar oven, which will be the foundation that holds all the other components together. The goal is to create a box-like structure with an open top:
- Select materials – You’ll need cardboard, wood, or a material that can withstand high temperatures and provide insulation.
- Cut the sides – Measure and cut four equal sides for the walls and an additional piece for the bottom. The size will determine how much you can cook at once.
- Assemble the frame – Using nails, screws, or adhesive, connect the walls at a 90-degree angle, forming a square or rectangular frame, then attach the bottom piece securely.
- Insulate – Add insulation inside the frame to retain heat. Options include cotton batting, wool, or foam.
- Seal gaps – Use foil tape or another heat-resistant tape to cover any seams or openings to prevent heat loss.
Installing Reflective Surfaces
The efficiency of a solar oven hinges on its ability to concentrate sunlight. Here’s how to add reflective materials to your frame to maximize sun exposure:
- Choose Reflective Material: Aluminum foil is a readily available option. Alternative reflective materials include reflective Mylar or a mirror.
- Attach to the Lid: Construct a lid with a flap that will stand to reflect sunlight into the oven. Glue the reflective material to the inside surface of this flap.
- Line the Interior: Line the inside of the oven with your reflective material. Ensure it is smooth and clean for optimal reflection.
- Angle for Sunlight: Adjust the flap to an angle where it can catch and redirect the most sunlight. This may take some experimentation.
With the solar oven frame crafted and the reflective surfaces in place, your homemade solar oven is nearly complete. Ensure all reflective surfaces are securely attached and angled correctly for maximum solar gain. A clear glass or plastic cover can be added as the final step to help trap heat while still allowing sunlight to enter.
Optimizing Cooking Performance
Within the realm of eco-friendly cooking, solar ovens stand out for their ingenious use of natural resources. However, even without the conventional pizza box, your homemade solar oven’s effectiveness hinges on your ability to optimize its performance. A finely tuned solar oven taps into the abundant power of the sun to cook a variety of foods with efficiency and ease. The secrets to peak cooking performance lie in strategic positioning and a savvy approach to handling food destined for solar-heated cuisine.
Positioning The Solar Oven For Maximum Sun Exposure
To maximize the energy absorbed by your solar oven, proper alignment with the sun is crucial. Begin by considering the path of the sun across the sky—your oven should face directly towards the sun, angling the reflective surfaces to bounce sunlight into the cooking chamber. Follow these steps to ensure optimal sun exposure:
- Track the sun’s motions throughout the day to determine the best orientation for your oven.
- Tilt the oven at an angle that reflects the sunlight straight into the cooking area. This often means adjusting the angle through various stages of the day.
- Use a sun tracker app or a DIY sundial to assist with real-time adjustments—an essential step for consistent cooking temperatures.
Preparing And Cooking Food In The Solar Oven
The way you prepare and cook your food in a solar oven can significantly affect its cooking performance. Once situated properly, you’ll want to bear in mind these practical tips:
- Preheat your solar oven before adding your food—just as with a traditional oven, an evenly heated space is key to well-cooked meals.
- Choose dark cookware, preferably with a tight-fitting lid to enhance heat absorption and retention.
- Opt for thinner slices or smaller pieces of food to expedite the cooking process and achieve more consistent results.
- Stir your food occasionally if possible, to distribute heat evenly.
- Keep the oven closed and undisturbed for the majority of the cooking time to maintain temperature.
Careful attention to these factors will help you harness the full potential of your solar oven, pushing past the limitations of traditional sun-powered cooking methods.
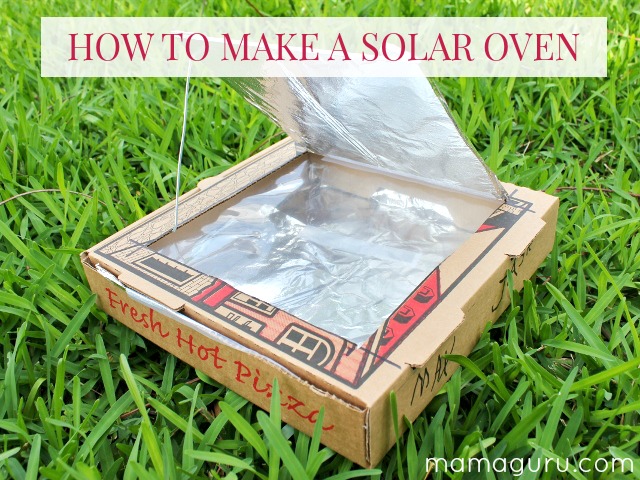
Credit: mamaguru.com
Frequently Asked Questions For How To Make A Solar Oven Without A Pizza Box
How To Make A Solar Oven With Household Items?
Gather a pizza box, aluminum foil, plastic wrap, black construction paper, and tape. Line the box interior with foil, place the black paper at the bottom, cover the opening with plastic wrap, and seal with tape. Your solar oven is ready to harness the sun’s power.
Can You Make A Solar Oven With A Shoebox?
Yes, you can create a functional solar oven using a shoebox. Line it with aluminum foil to reflect sunlight and generate heat for cooking.
How Do You Make A Solar Oven With Aluminum Foil?
To make a solar oven with aluminum foil, line a box interior with foil to reflect sunlight. Place black cookware inside to absorb heat. Seal with a glass lid.
How To Make A Pizza Box Solar Oven For Kids?
Gather a pizza box, aluminum foil, plastic wrap, black construction paper, and tape. Line the box interior with foil, shiny side up. Place the black paper at the bottom. Seal the lid’s window with plastic wrap, creating a greenhouse effect.
Place under direct sunlight to heat.
Conclusion
Crafting your own solar oven can be a rewarding DIY project. As we’ve explored, even without a pizza box, it’s possible. With household materials and ingenuity, you can harness the sun’s power for outdoor cooking. Remember to be patient and give it a try—solar-powered treats await!