
To make a solar oven, you’ll need a cardboard box, aluminum foil, and clear plastic wrap. Transform the box into a cooker by lining it with foil to reflect light, sealing it with plastic, and harnessing the sun’s power.
Creating your own solar oven is a fun and educational project that demonstrates how renewable energy can be harnessed for everyday use. With simple materials like a pizza box or any medium-sized cardboard box, aluminum foil, plastic wrap, and a few additional household items, you can cook food using the sun’s rays.
This DIY activity is not only an excellent way to teach kids about solar power but also provides a portable cooking method that’s perfect for camping or picnics. The construction process is straightforward and quick, allowing you to enjoy solar-cooked food in just a few hours. Follow these guidelines, and you’ll soon have an eco-friendly cooker that can reach temperatures sufficient to cook certain foods or melt s’mores for a tasty treat.
Materials Needed For Building A Solar Oven
Embarking on the journey of creating a solar oven? The first stride is gathering the materials. The beauty of this project lies in its simplicity – you’ll use everyday items that are readily available. Not only is this DIY craft an entertaining experiment, it’s also a step towards sustainable living. By harnessing the power of the sun, you’ll cook food without the need for conventional energy sources. Here’s everything you need to get started:
Cardboard Box
A sizable cardboard box will serve as the main structure of your solar oven. It should be large enough to accommodate the pot or pan but compact enough for easy handling. Sturdy boxes are preferred for better insulation.
Aluminum Foil
Aluminum foil’s reflective properties are ideal for directing sunlight into the oven. Ensure you have enough foil to cover the interior surfaces and create reflective panels.
Glue
A non-toxic glue will be vital for securing the aluminum foil to the cardboard. Opt for a strong adhesive that can withstand high temperatures.
Scissors
You’ll need a pair of sharp scissors for cutting both the cardboard and aluminum foil to the right sizes and shapes.
Clear Plastic Sheet
The solar oven needs a transparent cover to trap heat while allowing sunlight to penetrate. A clear plastic sheet will be perfect for creating this greenhouse effect.
Black Construction Paper
Black construction paper absorbs heat, making it an essential component of the oven’s interior. It will sit at the base, helping to increase the temperature inside.
Thermometer
To monitor the oven’s temperature, you’ll need a thermometer capable of reading high temperatures. This is especially necessary for food safety and cooking efficiency.
Ruler
A ruler will assist you in measuring and cutting materials precisely, ensuring your solar oven components fit together seamlessly for optimal performance.
With these materials in hand, you’re ready to construct your solar oven. The upcoming sections will guide you through each step of the building process, from assembly to cooking your first solar-powered meal. Let the crafting begin!
Preparing The Cardboard Box
Embarking on a DIY project to harness the sun’s power can be both rewarding and educational. Building a solar oven with an ordinary cardboard box is an excellent starting point for green energy enthusiasts. The first step in this eco-friendly venture is preparing the cardboard box, the core component of your solar oven.
Selecting The Right-sized Box
Choosing an appropriate box is crucial for the efficiency of your solar oven. A right-sized box should be large enough to accommodate your cooking dish but compact to ensure maximum heat retention. Here’s a quick guide to select the ideal box:
- Sturdiness: Opt for a box made from corrugated cardboard, ensuring it can withstand high temperatures.
- Size: A box measuring around 24 inches in width and 15 inches in height is generally considered optimal.
- Depth: Ensure the box has a depth of at least 12 inches to have sufficient room for insulation.
Cutting And Assembling The Box
Proper cutting and assembling of the box are essential for creating an effective solar oven. Here’s what you need to do:
- Cut out a flap on the top of your box, leaving at least a 1-inch border around the three sides.
- Create smooth edges to prevent injury and ensure the reflective surfaces adhere well.
- Reinforce the flaps with additional cardboard pieces for stability.
- Glue or tape the inner lining to minimize air gaps and improve heat retention.
Adding Reflective Surface With Aluminum Foil
Aluminum foil is the key to reflecting sunlight into your box, turning it into a functional solar oven. Adhere to these steps to add the reflective surface:
- Cut aluminum foil to match the size of the inner surfaces of the box, including the flap you created.
- Apply glue evenly on the cardboard surfaces and carefully place the foil, shiny side out, smoothing out wrinkles and air bubbles.
- Secure the edges with durable tape to ensure longevity and maximum reflectivity.
With the box prepared, you’re now ready to harness the sun’s energy for cooking. The reflective surfaces inside the box will converge the sunlight to a central area, significantly raising the temperature necessary for cooking or heating food.
Creating The Insulation And Heat Absorber
Unlock the power of the sun in your very own backyard by constructing a solar oven using a simple cardboard box. Creating the insulation and heat absorber is a crucial step in this eco-friendly project. It’s where science meets sustainability, transforming a box into a vessel that harnesses solar energy for cooking. Let’s dive into the assembly process with precision and enthusiasm!
Layering The Inside Of The Box With Black Construction Paper
The first step in crafting your solar oven’s interior is to lay a solid foundation for heat absorption. Black construction paper excels at absorbing sunlight and converting it into thermal energy. Follow these steps:
- Cut the black construction paper to size, ensuring it covers the entire interior of the cardboard box.
- Use non-toxic glue to adhere the paper to the sides and bottom firmly, avoiding air bubbles and wrinkles.
- Ensure the paper’s surface remains unobstructed to maximize sun exposure.
Adding The Insulation Layer
Insulation is paramount to retain the collected heat. Here, common materials double as effective insulators:
- Gather old newspapers, shredded paper, or even cotton fabric.
- Fill the space between the outer and inner box walls, if using a double-box design.
- For a single-box oven, attach additional cardboard flaps to the sides and insulate accordingly.
Ensure that every gap has a snug fit, minimizing heat escape. This step optimizes your solar oven’s thermal efficiency.
Attaching The Clear Plastic Sheet As The Oven Door
The oven door plays a dual role in trapping heat and allowing sunlight to enter. To install the clear plastic sheet:
- Cut the plastic sheet to fit over the top of the open box, leaving extra inches around the edges for sealing.
- Secure the sheet with high-temperature-resistant tape, creating a tight seal around all edges.
- For enhanced insulation, consider double-glazing the door by using two plastic sheets with an air layer in between.
This transparent seal creates the greenhouse effect inside the oven, elevating temperatures to cook a variety of foods.
Testing And Using The Solar Oven
Constructing a solar oven from a simple cardboard box is a fun and enlightening project that emphasizes sustainable cooking practices. After crafting your eco-friendly oven, the crucial phase arrives: Testing and Using the Solar Oven. This involves understanding how to monitor the temperature, cook food efficiently, and maintain your solar appliance. It’s time to harness the sun’s power and embark on a culinary quest that’s both innovative and environmentally friendly.
Monitoring The Temperature Using A Thermometer
For optimal cooking results in your solar oven, keeping a close eye on the interior temperature is essential. Using a thermometer ensures food safety and helps you gauge cooking times. Insert the thermometer into the oven’s interior making sure it’s directly visible through the transparent cover, allowing for easy monitoring without opening the oven’s door—a vital step in maintaining a consistent cooking environment.
- Preheat the oven for at least 30 minutes before cooking.
- Check the thermometer regularly to ensure stable cooking temperatures.
- Adjust the oven’s orientation towards the sun if necessary to maintain heat.
Placing And Cooking Food In The Solar Oven
With the oven preheated, it’s time to place your food inside. To avoid heat loss, quickly open the oven and place your cooking pot or tray on the interior shelf or base. Ensure that the pot is dark-colored or black to absorb maximum sunlight. Close the oven immediately to trap the heat. Note that cooking times vary and may be longer than conventional methods.
| Food Type | Estimated Cooking Time |
|---|---|
| Vegetables | 1-2 hours |
| Meat | 2-4 hours |
| Bread | 2-3 hours |
Tips For Efficient Use And Maintenance
To maximize the performance and lifespan of your solar oven, follow these maintenance and efficiency tips:
- Regularly clean the transparent cover to ensure maximum sunlight penetration.
- Keep the reflectors and inner cooking space free from dirt and grease.
- Store your solar oven in a dry place to prevent cardboard deterioration.
Moreover, enhance the efficiency of your solar oven by:
- Using pots with tight-fitting lids to retain heat.
- Minimizing the number of times you open the oven door.
- Repositioning the oven to track the sun’s movement every 30 minutes.
- Pre-cutting food into smaller pieces for faster cooking.
Regular upkeep and thoughtful cooking strategies not only contribute to delicious solar-cooked meals but also ensure a sustainable cooking experience for years to come.
Safety Measures And Additional Tips
Crafting a solar oven from a humble cardboard box is a fantastic project that radiates with DIY charm and harnesses the power of the sun. But as with any creation that deals with heat and reflective materials, it’s crucial to observe certain safety measures to enjoy your solar cooking experience to the fullest. Let’s explore these precautions along with tips to amplify your oven’s performance and understand its environmental impact.
Precautions To Take While Working With The Solar Oven
- Wear Protective Gloves: Always use gloves when cooking as the oven can get extremely hot, protecting your hands from burns.
- Supervise Children: Ensure that children are supervised at all times around the solar oven to prevent accidents.
- Secure Reflective Materials: The reflective panels must be securely attached to prevent them from dislodging and causing injury or malfunction.
- Check for Sharp Edges: Cardboard can have sharp corners, so be sure to tape them down or cover them to reduce the risk of cuts.
Maximizing The Efficiency Of The Solar Oven
- Strategic Placement: Position your solar oven to face the sun directly, and adjust its angle for optimal exposure as the sun moves.
- Preheat Your Oven: Like a conventional oven, allow your solar oven to preheat before adding your food for a quicker and more even cook.
- Insulation Matters: Enhance your oven’s heat retention by improving its insulation, using materials like aluminum foil and black paint.
- Mind the Weather: Solar ovens rely on sunshine. Therefore, clear skies contribute to better cooking conditions; plan your solar cooking accordingly.
Eco-friendly Benefits And Future Advancements
Embracing a solar oven for your culinary experiments doesn’t just add a ‘sizzle’ to your outdoor adventures; it’s a step toward a sustainable lifestyle. Unlike conventional ovens that rely on electricity or gas, solar ovens reduce carbon emissions and conserve nonrenewable energy sources. They epitomize off-grid cooking, making them perfect for campers and eco-conscious gourmets alike.
| Eco-Friendly Benefit | Future Advancement Potential |
|---|---|
| Zero Operating Emissions | Development of higher efficiency reflective materials. |
| Sustainable Cooking | Integration of solar tracking systems for optimal heat retention. |
| Waste Reduction | Use of biodegradable materials for even more eco-friendly designs. |
With ongoing innovations in solar technology, future models of solar ovens could boast better heat absorption, more portable designs, and even smarter cooking features. The possibilities for this green gadget are as bright as the sun it relies upon, and the benefits to our planet are just as warm and inviting.
Credit: mamaguru.com
Frequently Asked Questions On How To Make A Solar Oven With A Cardboard Box
How Hot Can A Cardboard Box Solar Oven Get?
A cardboard box solar oven can reach temperatures up to 200 degrees Fahrenheit (93 degrees Celsius) on a sunny day.
Can You Make A Solar Oven With A Shoebox?
Yes, you can create a solar oven using a shoebox by lining it with reflective materials and harnessing sunlight to cook food.
How Do You Make A Solar Oven Out Of A Cereal Box?
To make a solar oven from a cereal box, follow these steps: Cut a flap in the box lid, cover it with aluminum foil, line the inside with black construction paper, and tape a clear plastic sheet over the opening.
Place your food inside and aim it at the sun.
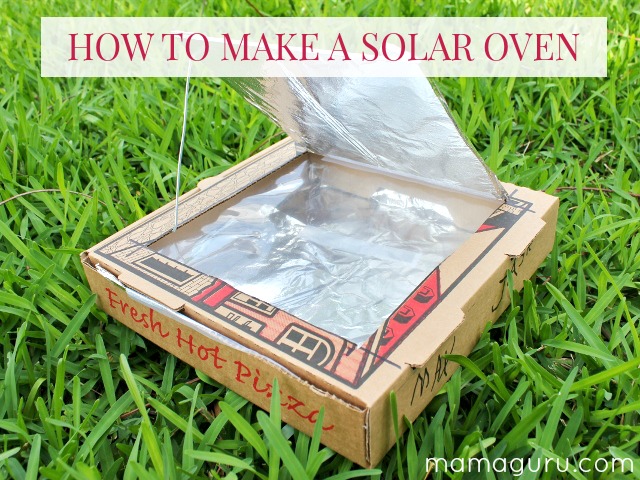
How To Make A Solar Oven Out Of A Pizza Box?
Gather a pizza box, aluminum foil, plastic wrap, and tape. Cut a flap in the box lid, leaving one side attached. Line the flap and box interior with foil, then seal the opening with plastic wrap. Place your food inside and focus sunlight on the flap to cook.
Conclusion
Crafting a solar oven from a humble cardboard box is a rewarding DIY project. It’s eco-friendly, cost-effective, and surprisingly simple. Embrace the power of the sun and enjoy the fruits of your creation. Start building your own solar cooker and take a step towards sustainable living today!